The post Feature spotlight: drivers appeared first on Beyond.
]]>Any planning that relies on a changeable figure – like a head count for personnel costs or an exchange rate for currency conversions – will work best as a driver.
Creating and managing drivers
On Beyond, drivers are created and managed by power users. Only power users can add and amend drivers, though managers are able to see them and add them into their reports.
Whenever a driver number has to change, it can be changed once – and every plan which uses it will be automatically updated.
(Don’t worry – we’ll let you know what’s going to change!)
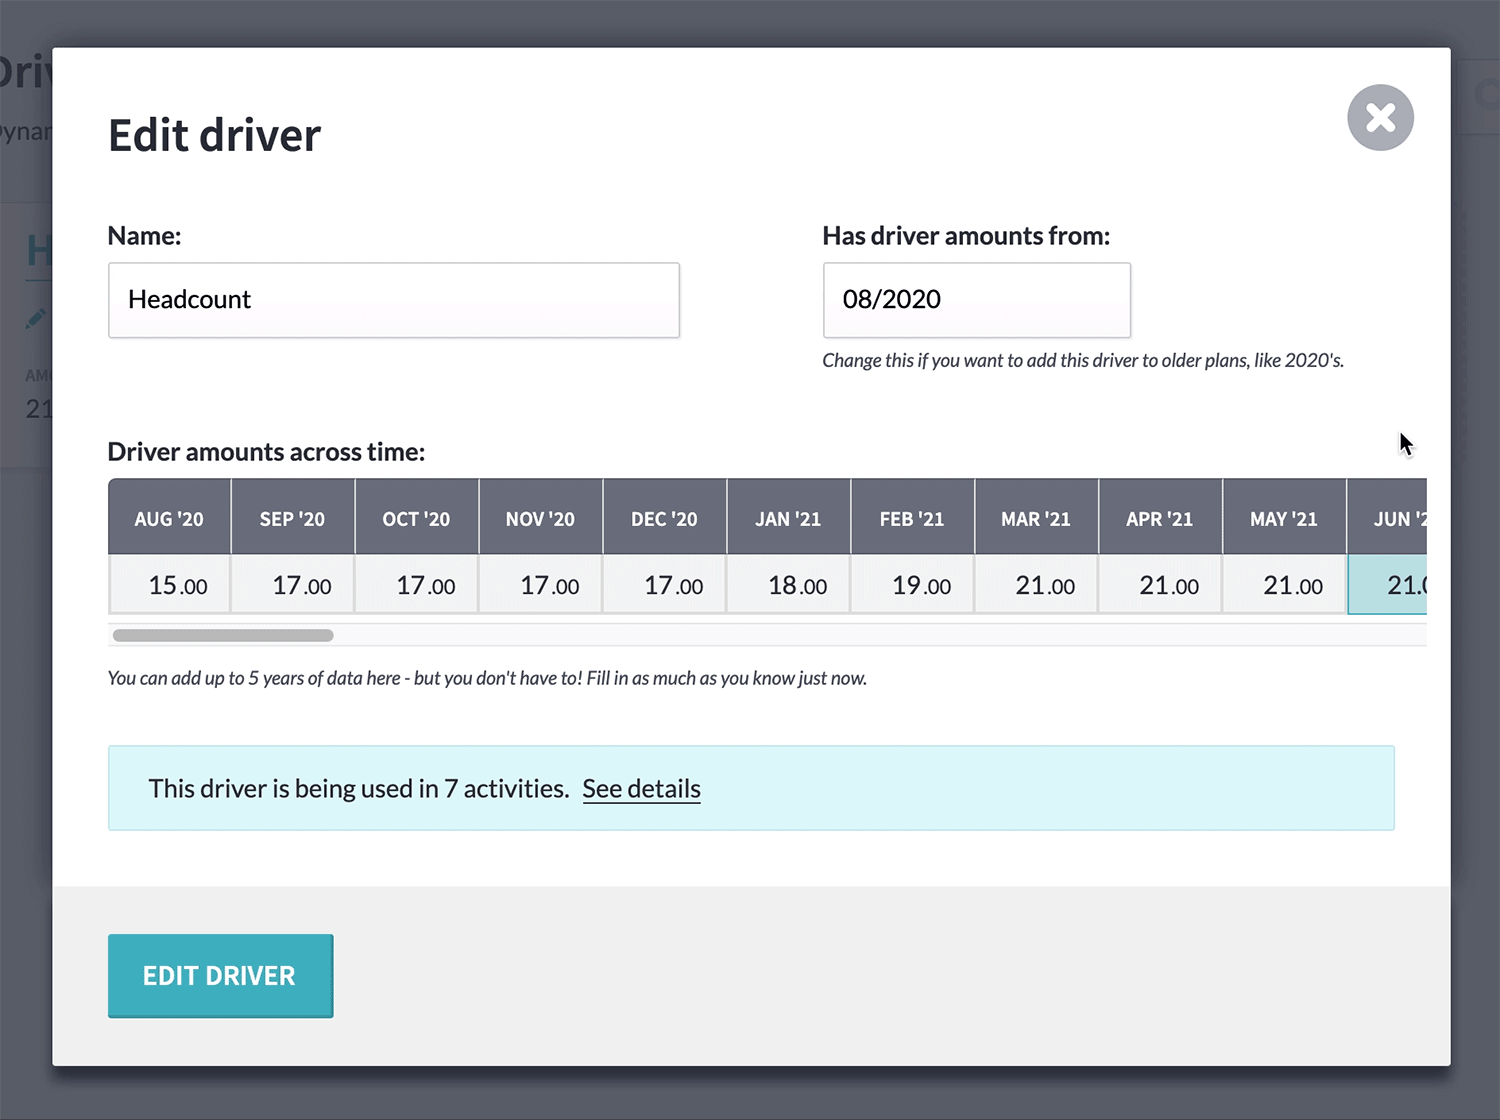
And the historical data won’t be changed. A driver can have up to five years’ worth of figures, broken down into monthly amounts, allowing you to keep your current and upcoming budgets up-to-date without affecting last year’s budgets.
Drivers are created and managed on the new ‘drivers’ page under ‘settings’. Try setting one up now.
Using drivers in activities
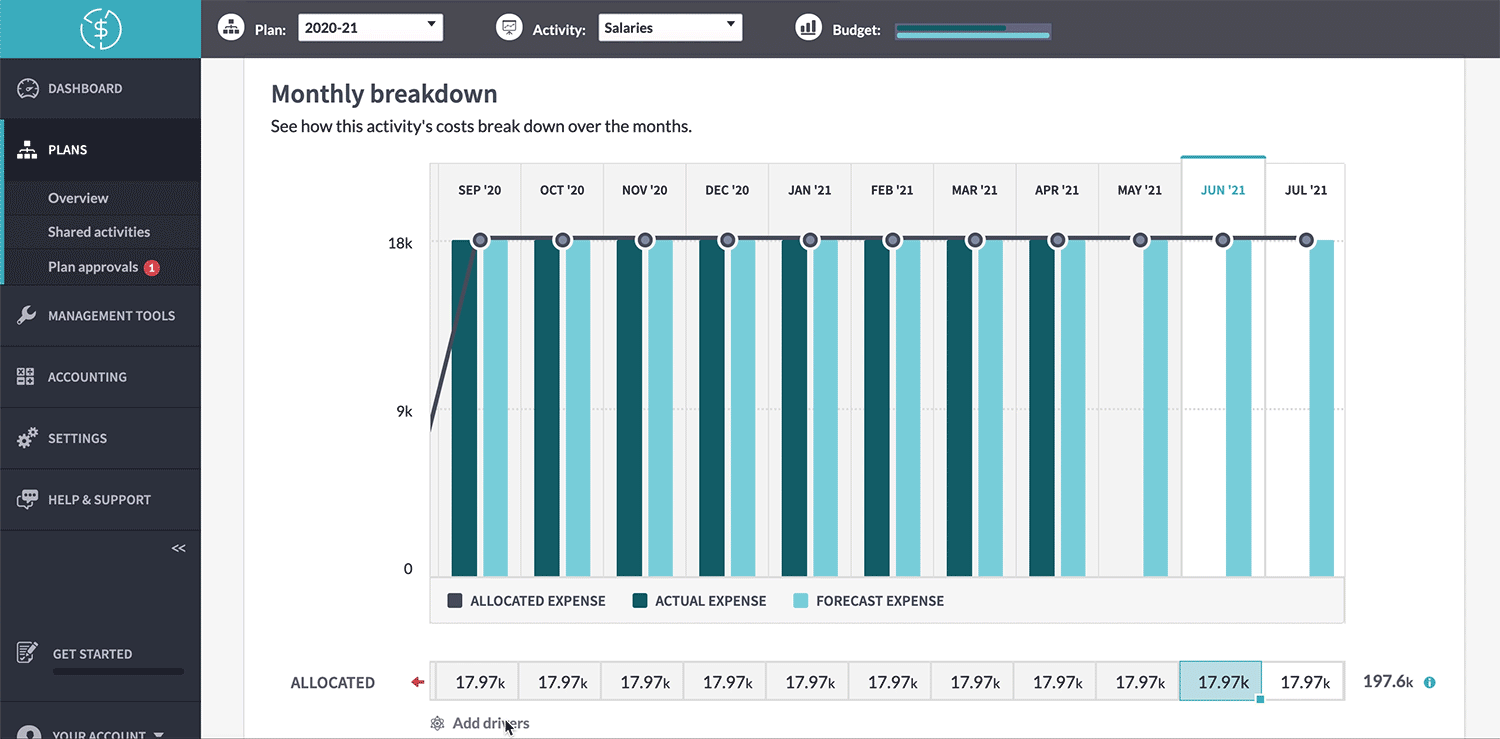
Power users and managers can add drivers into activity allocations or forecasts by clicking the ‘add drivers’ button on an activity’s monthly breakdown.
This will bring up a window where you can build a formula using drivers. That might be something like 100 x head count – where 100 is a per-person cost – or 1 x dollar conversion – where 1 is 1 GBP being converted to USD.
You can also build more complex formulas by adding, multiplying, dividing, or subtracting driver values.
Once you’ve created your formula, it will be applied to every month in your activity.
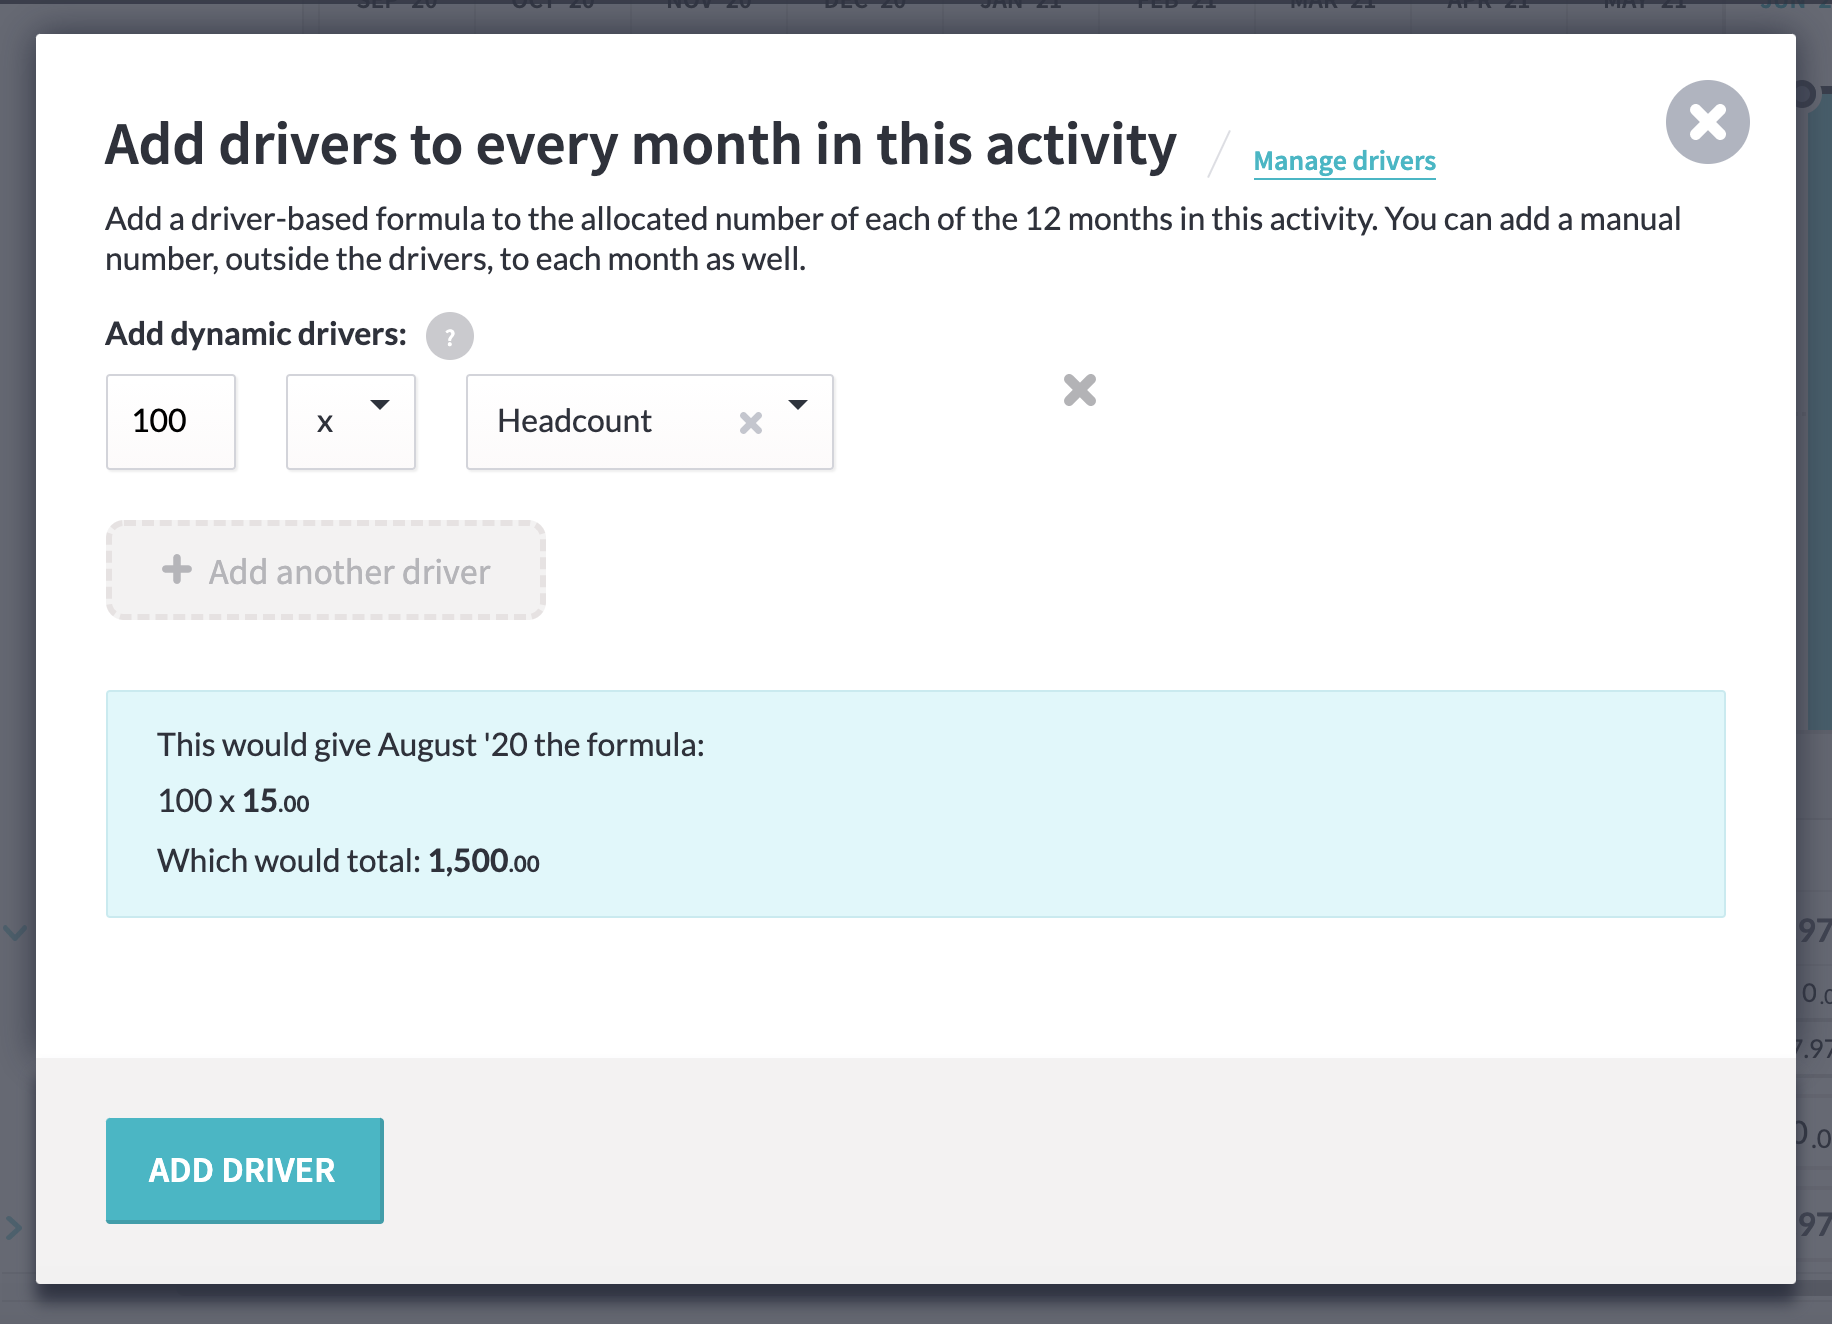
Similar to how adding a forecast row changes the breakdown, showing a total and then each individual forecast row, adding drivers will change the ‘allocated’ or ‘forecast’ row to an uneditable summary. The detail will be in two new rows underneath it – ‘driver’, showing the driver amount per month, and ‘manual’, which will let you add in extra figures, outside the driver.
If you want to remove a driver from a month or change its formula, you can click into an individual month to make changes, and drag those changes across the surrounding months.
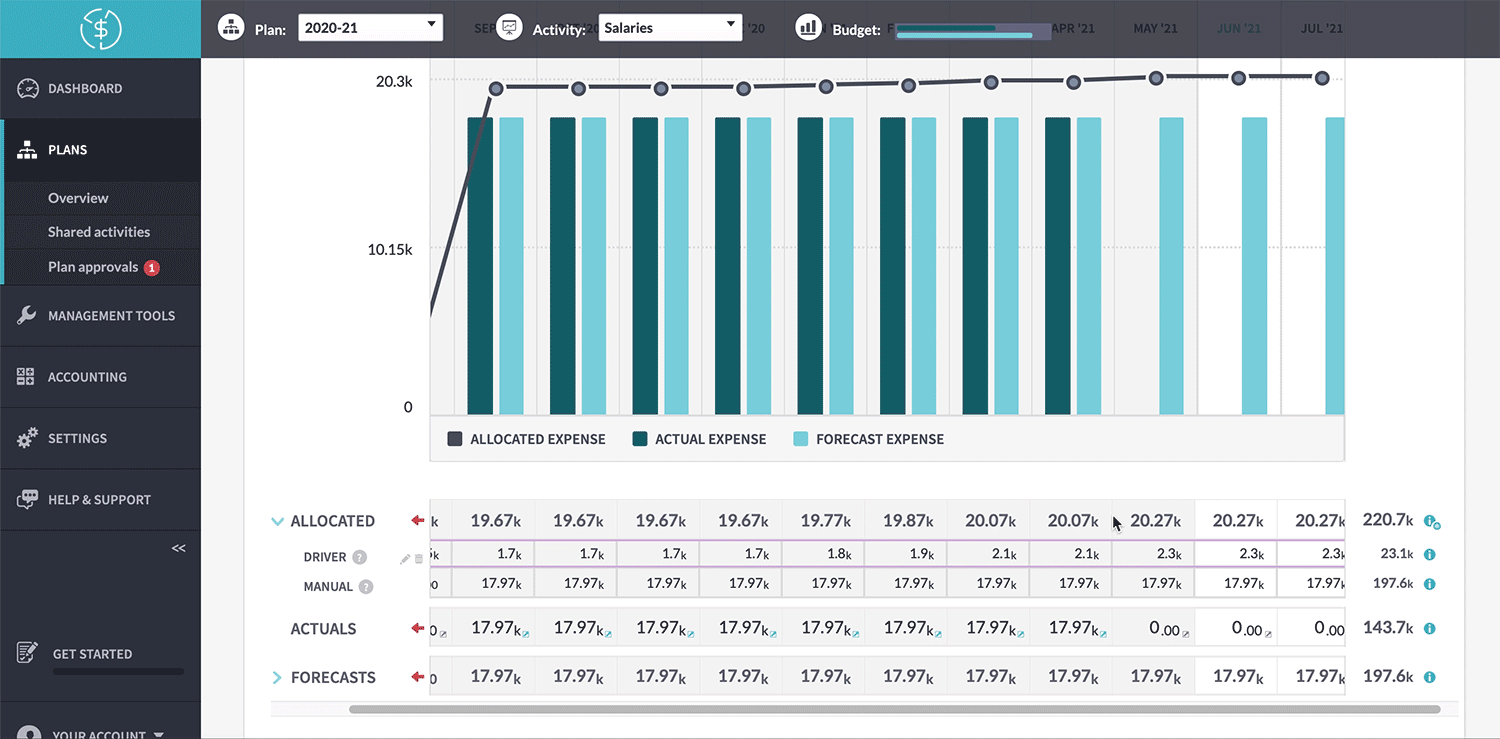
We’ll always hide the details when you go onto an activity page (save you scrolling!) but you can click on the blue arrow on the left or anywhere on the summary row to see the full breakdown.
Try adding drivers to your budgets now and bring your planning to the next level!
The post Feature spotlight: drivers appeared first on Beyond.
]]>The post Feature spotlight: copying a plan appeared first on Beyond.
]]>On Beyond, you can create a plan for your new financial year in two clicks, by basing it on your current plan.
First, click into your current plan and select ‘copy this plan’ from the menu.
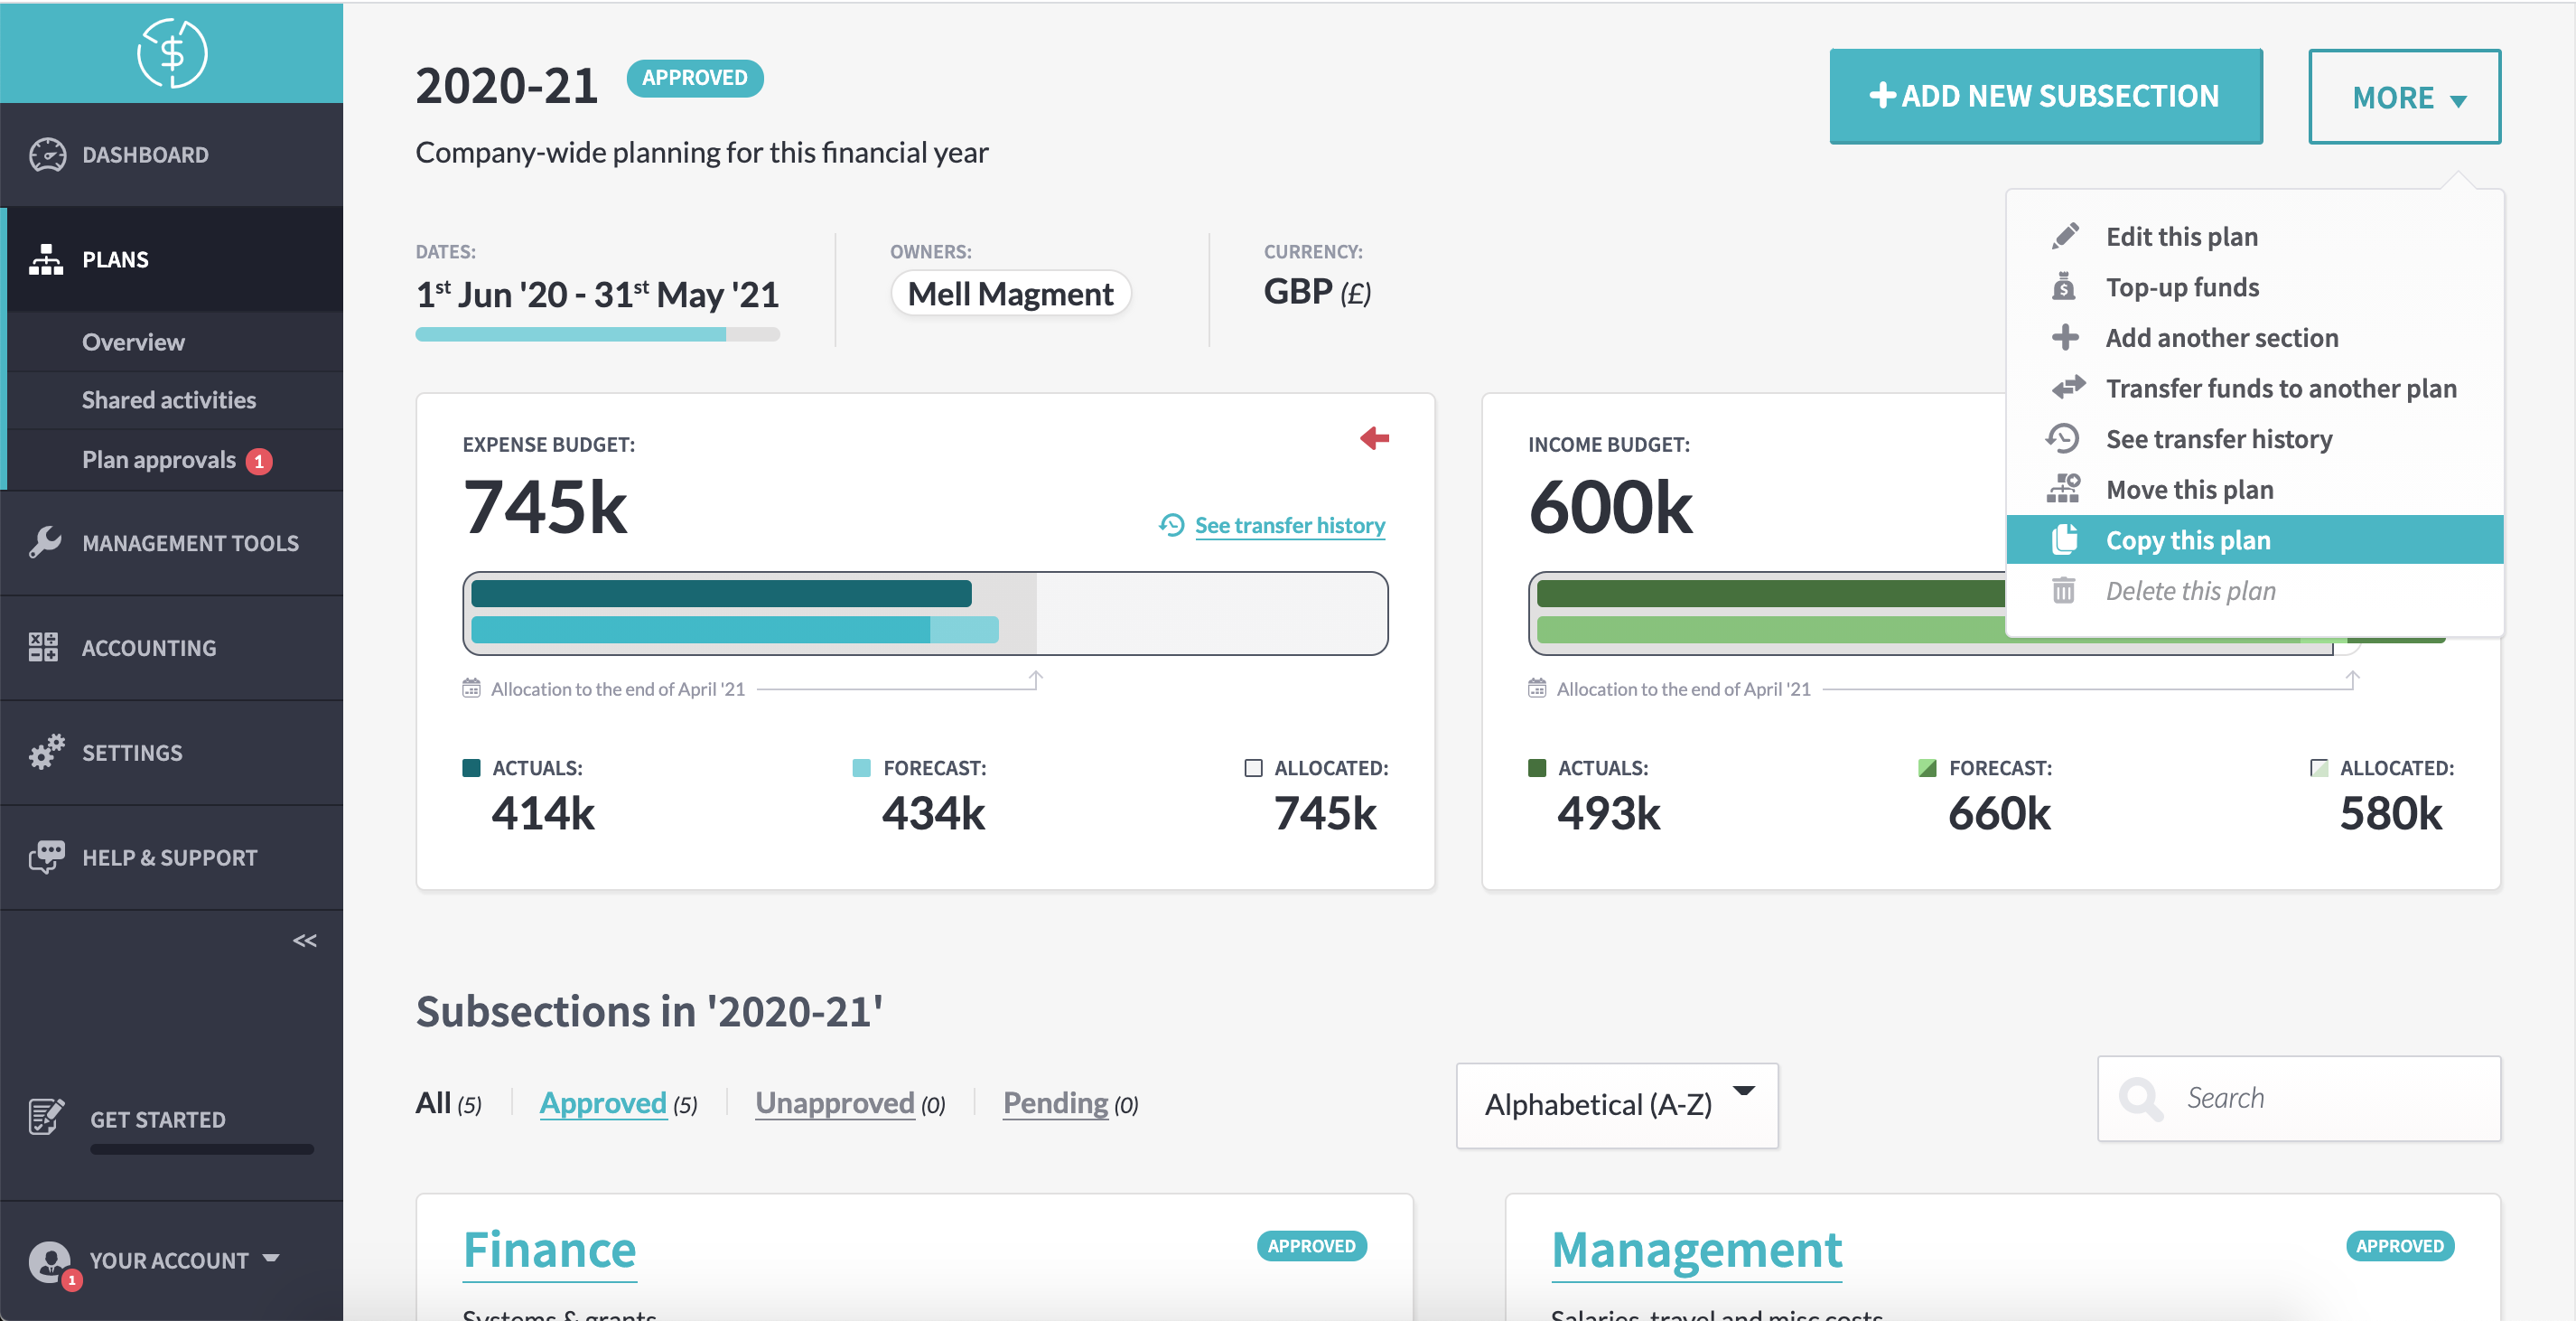
This will bring up a form where you can pick a plan name, an end date, and choose whether the plan budget is already approved.
If you want everyone who’s contributing to the plan to submit their budgets to you for approval, leave this on ‘no’. This is useful if you plan with bottom-up budgeting – if you don’t have exact numbers planned out for each department and you want them to put together a plan of what they’ll need for you to sign off on. (Just remember, your plan will only be reachable from the ‘unapproved’ tab until you’ve approved everyone’s budget!)
If you’re giving everyone a set amount and leaving them to sweat the details, tick ‘yes’. If you’re planning with top-down budgeting, this will save you some time!
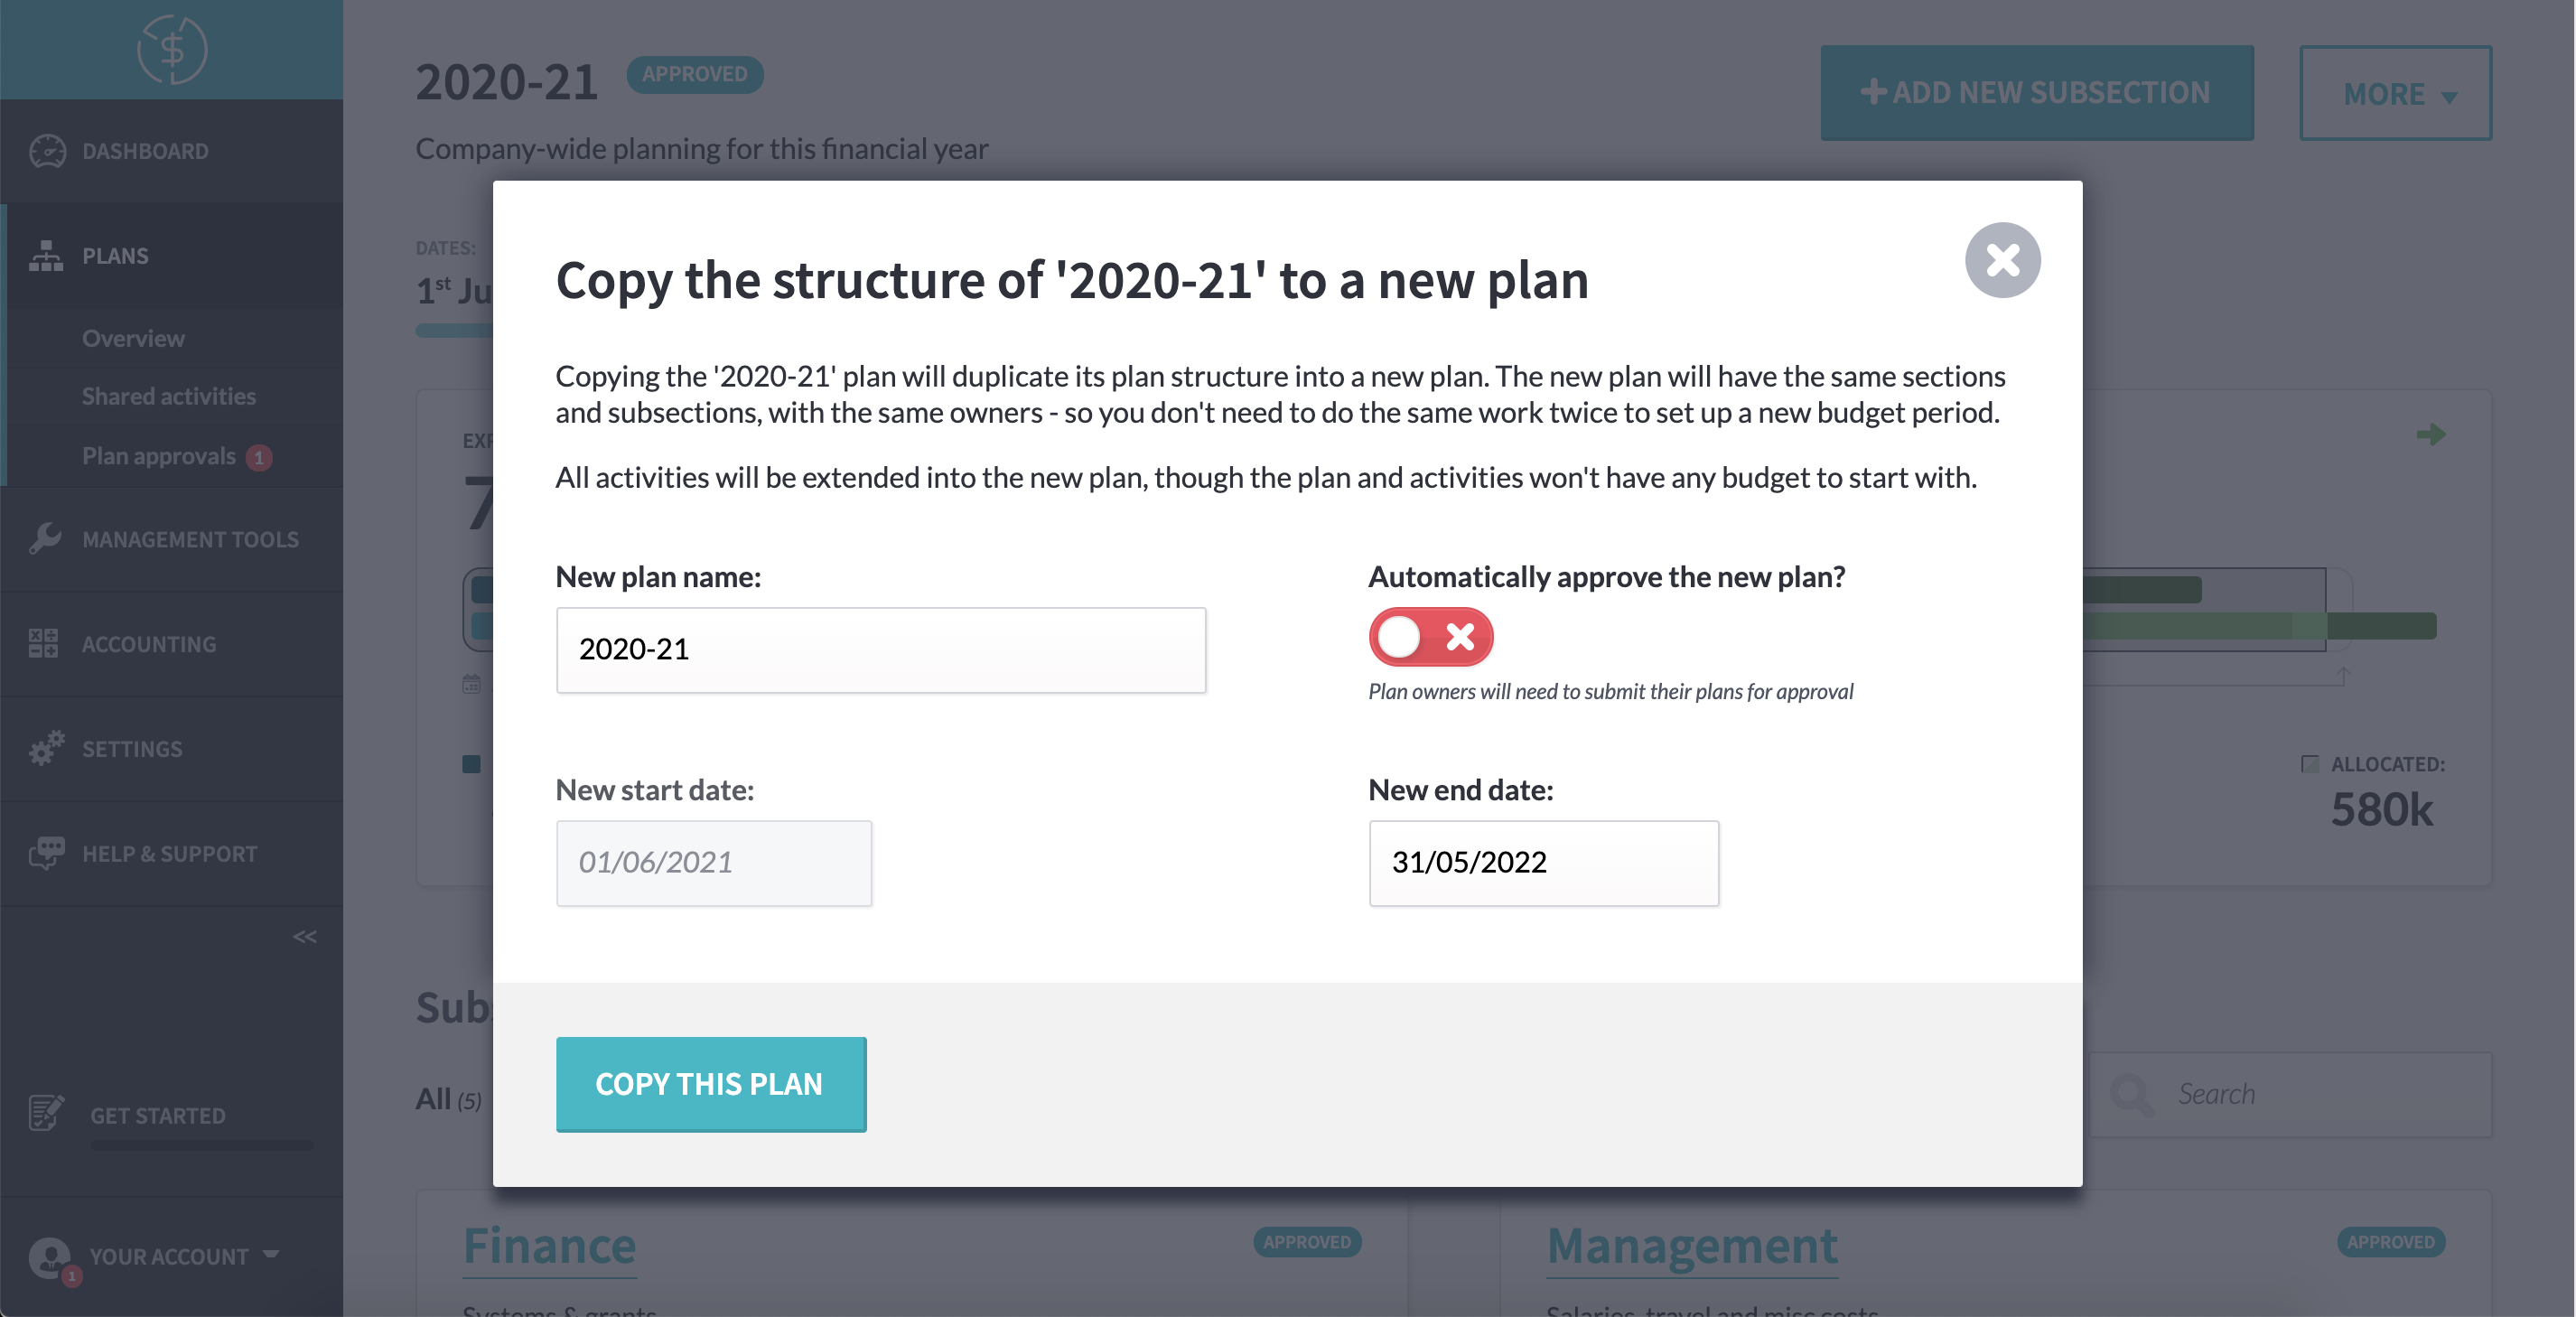
And – that’s it! Once you hit the ‘copy this plan’ button, a new zero-based* plan will be created, modelled on the same structure.
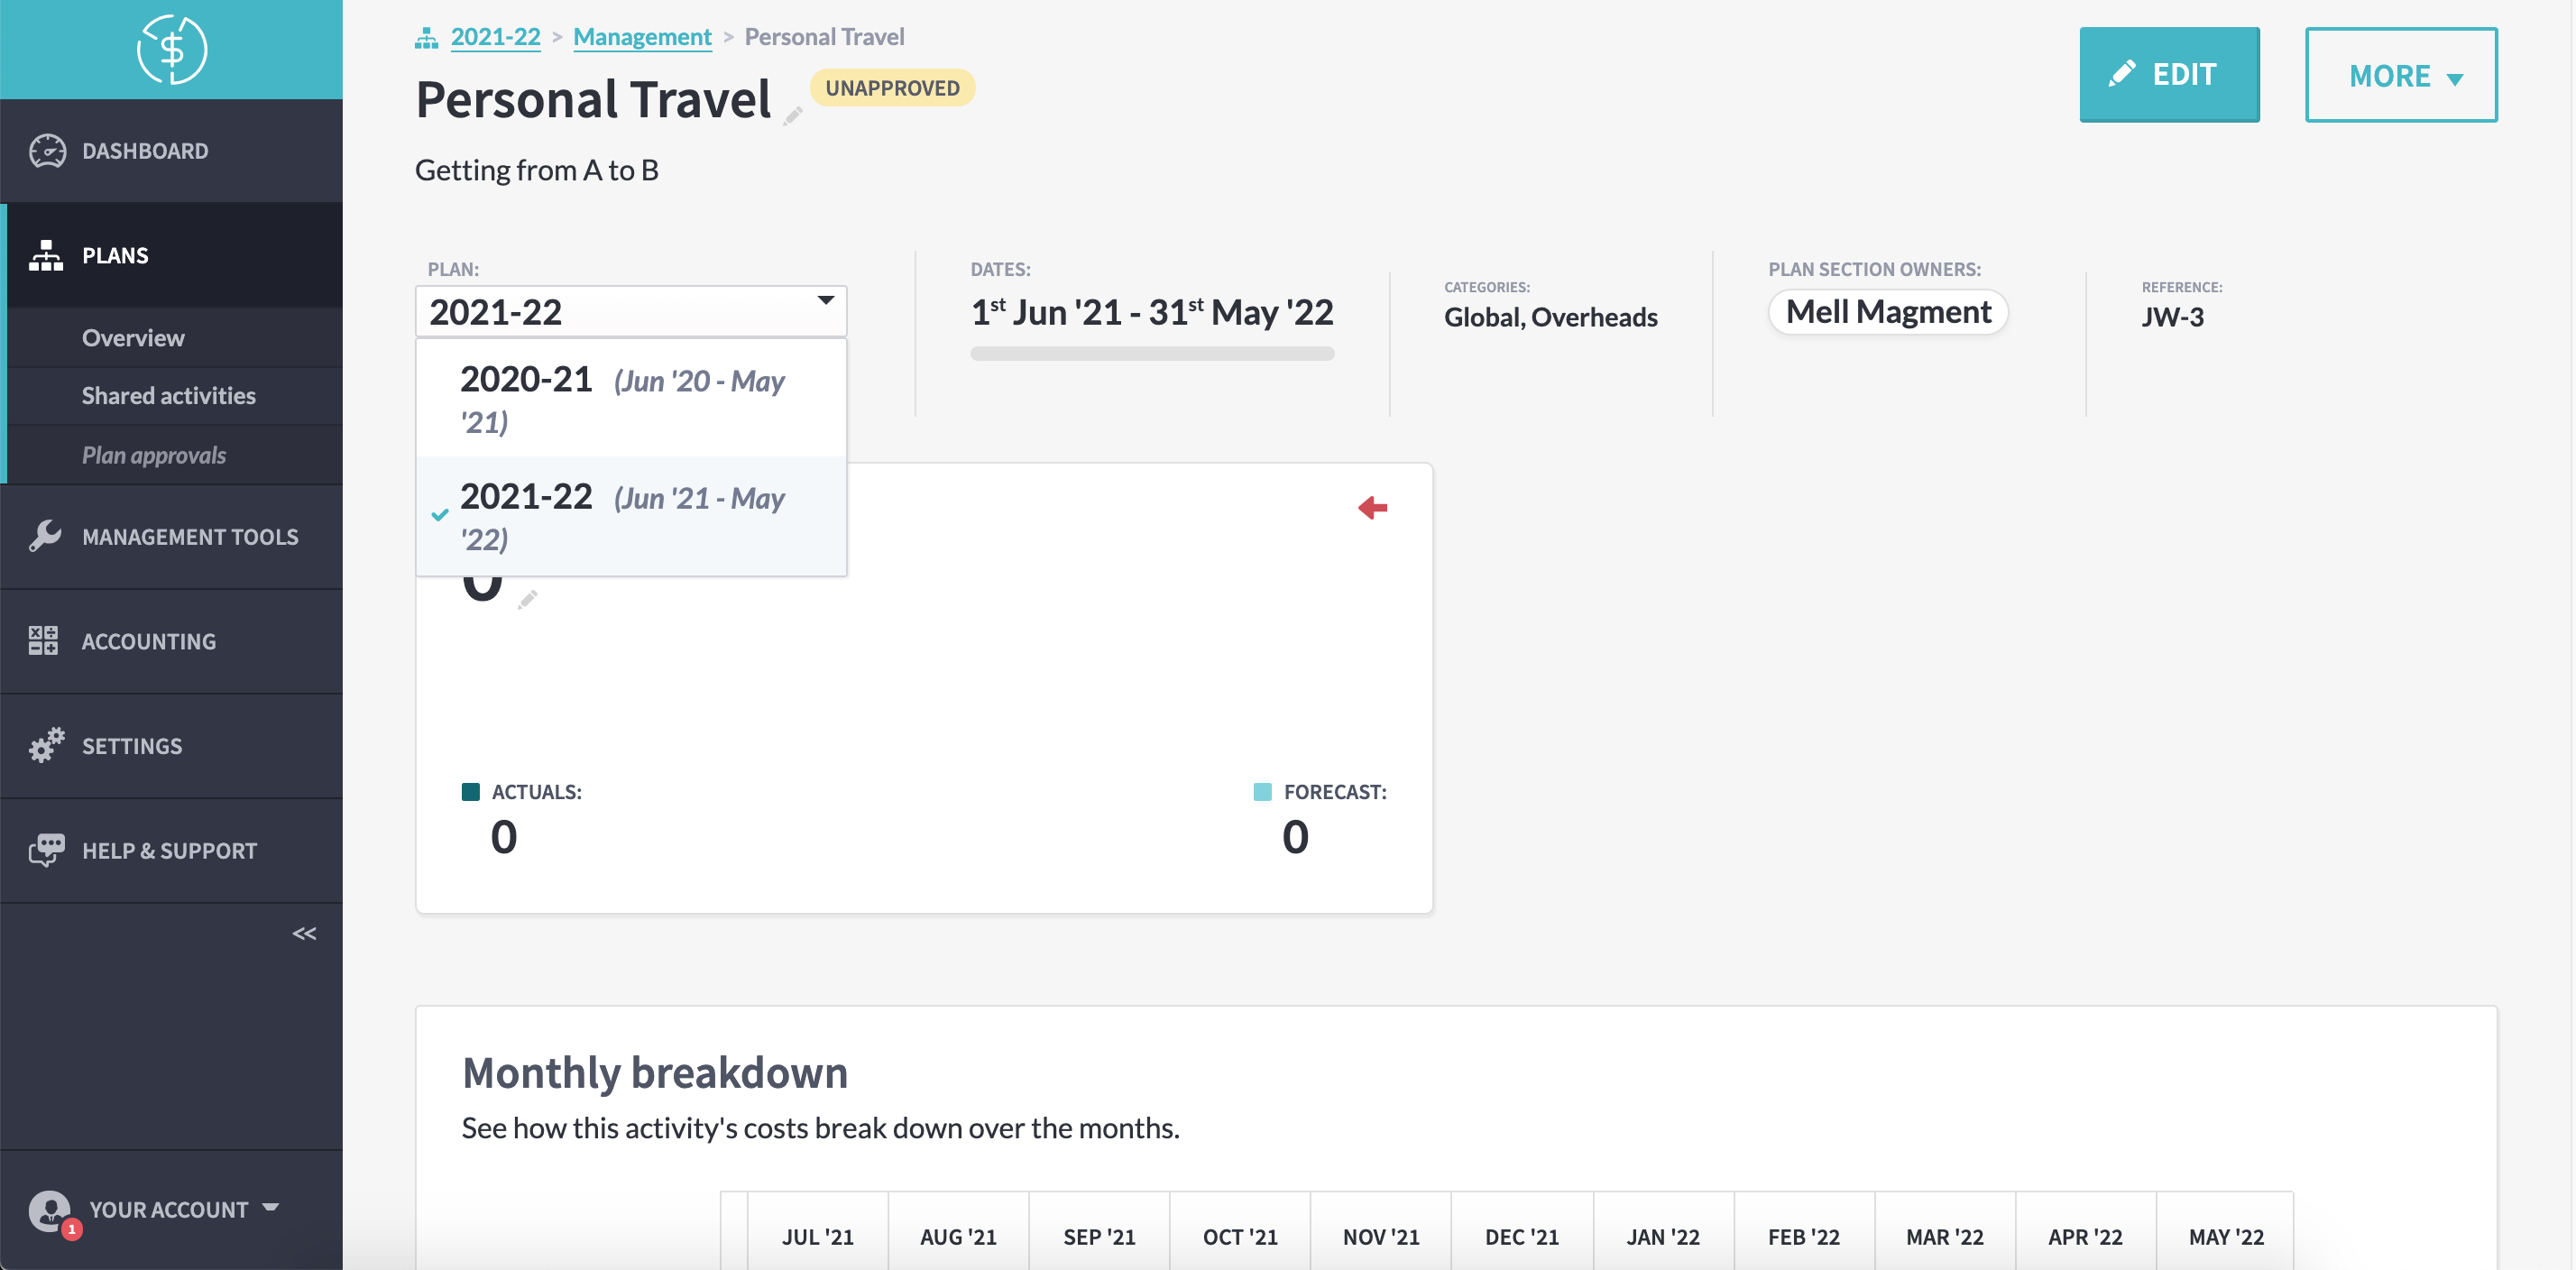
The details – like budgets, forecasts, and – of course! – actuals won’t be carried across, but the structure of the plan will. Your new plan will be broken down into the same departments, teams, and budget owners. Though you’re free to edit and delete as you need, without affecting the original plan.
Best of all, the activities in the original plan will be extended into the new plan; this means ongoing expenses, like rent and utility bills, will already be accounted for. Any changes made to them inside the new plan won’t affect their numbers inside the original, but the two will be linked together; your team can quickly switch between financial years to compare and track numbers.
And any automatic rules you’ve set up on your activities will keep running – you don’t need to set them all up again!
All that’s left is to go through the new plan, adding the new budgets and making whatever changes you need to. You can delete plan sections and activities without affecting the original plan – while being able to quickly compare long, ongoing projects between them.
(Though keep your eyes peeled – we’ll be adding incremental budgeting options soon, so you can carry across the numbers you care about and make your new budget even faster!  )
)
The post Feature spotlight: copying a plan appeared first on Beyond.
]]>The post Feature spotlight: breakdown reports appeared first on Beyond.
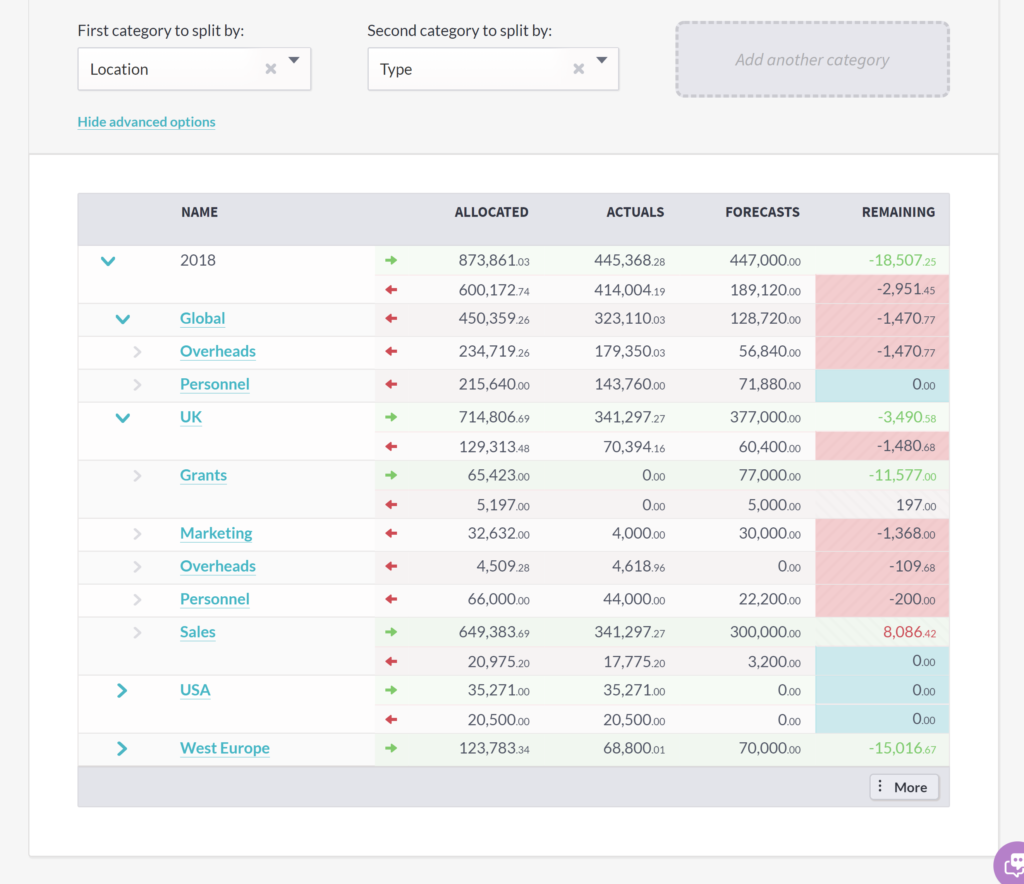
]]>Get a high-level overview of a plan (or multiple plans) broken down by the details that are most important to you – profit and loss, company structure, or custom categories.
Then delve into the details where you need to, drilling down into departments, teams, and individual contributions to the plan to get a full picture of your budget – and any potential problems.
Plan breakdown reports
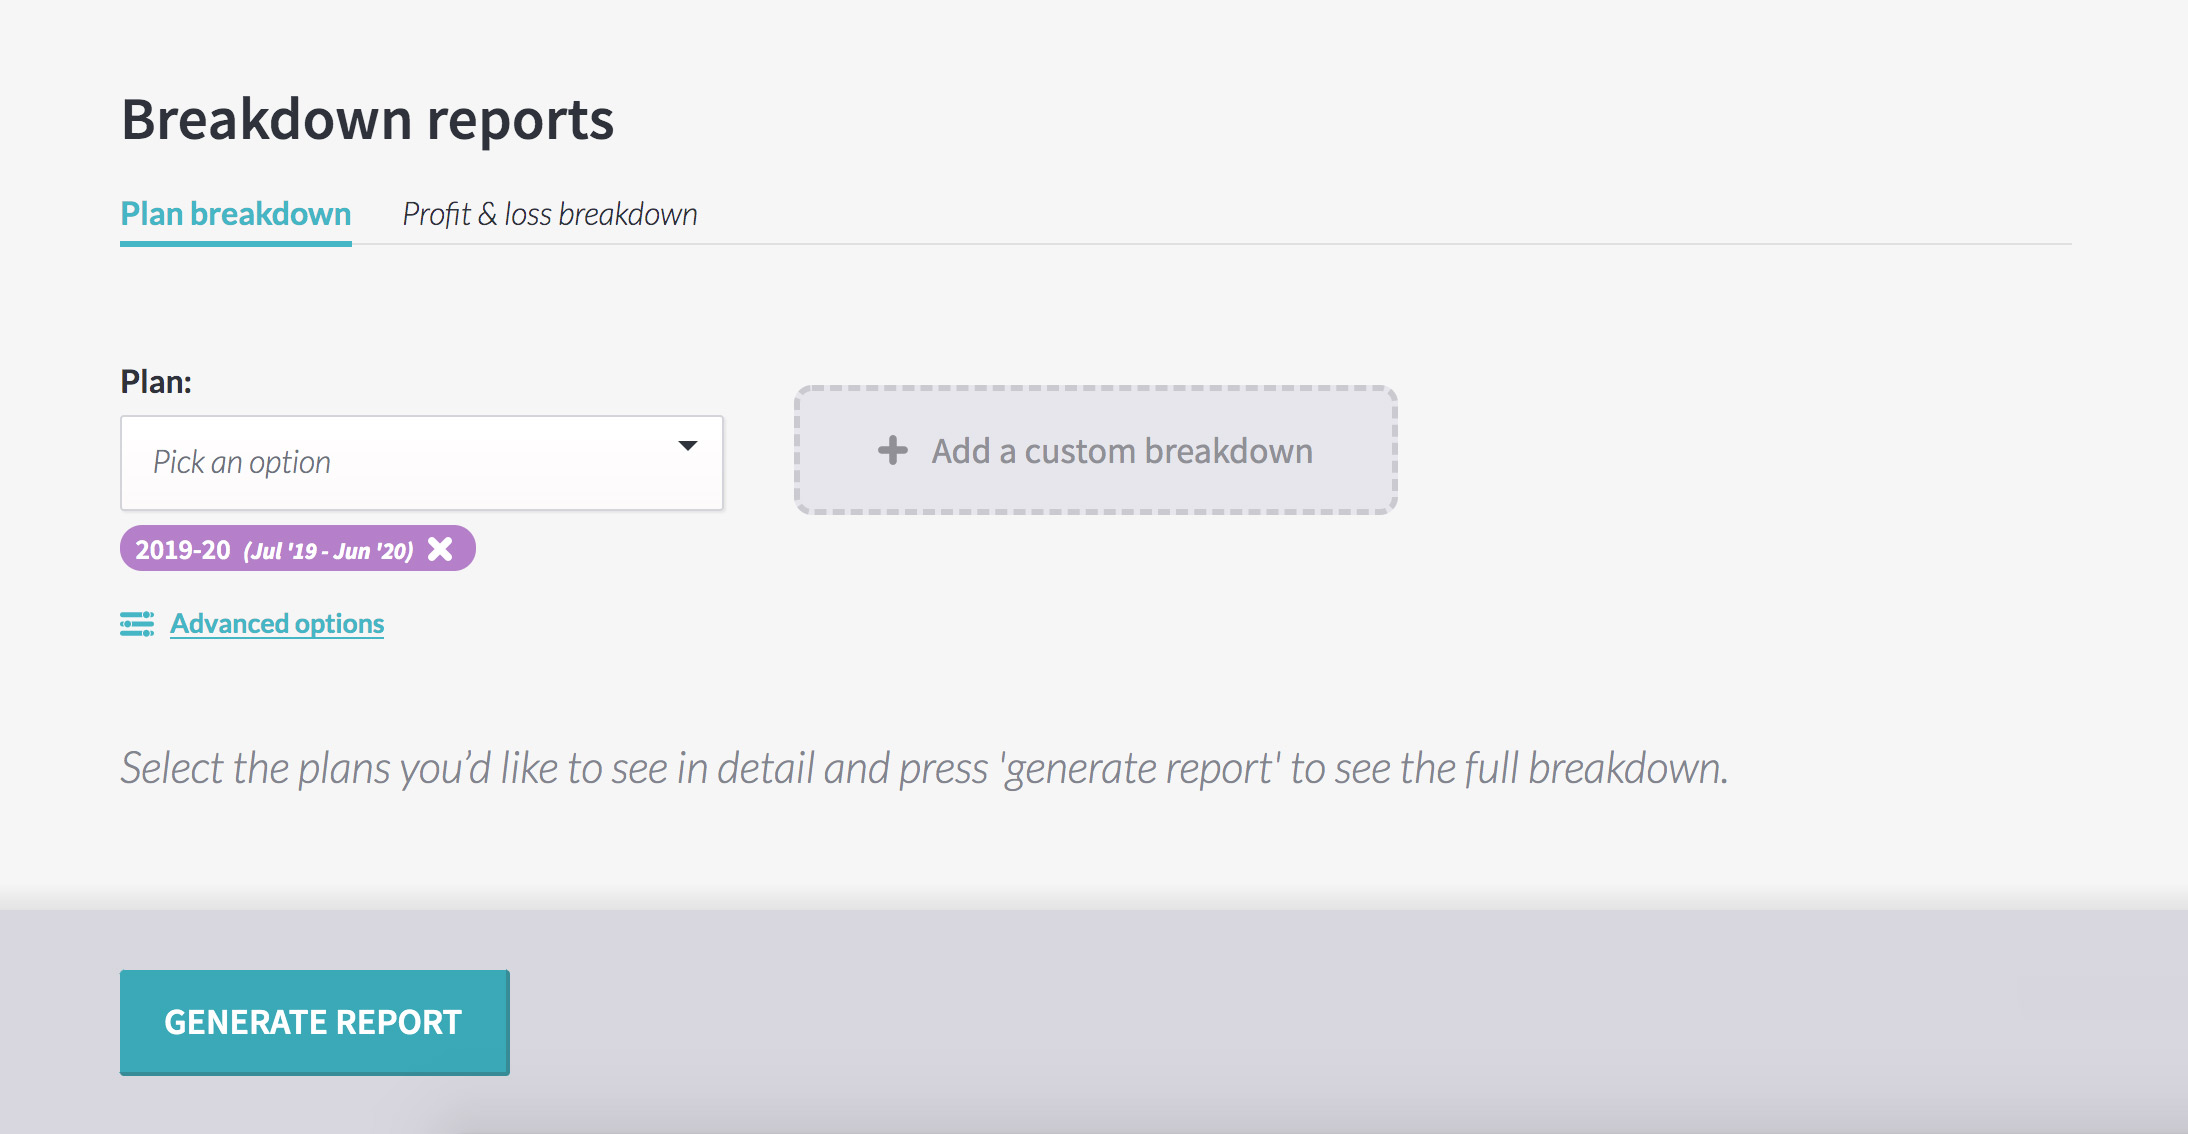
Available to managers and power users, the breakdown reports page is inside ‘management tools’.
To save you time, the plan your organisation is currently working on – like the 2020 budget – is pre-selected. Hit ‘generate report’ to see the plan, broken down by its first level of subsections.
Click the arrow by any subsection to drill down deeper, seeing that subsection’s subsections or its activities. Or, click the icon beside the section or activity name to jump directly to that part of the plan, to edit or manage it as needed.
When you’re finished, click the back button on your browser or ‘management tools’ in the navigation to return to the report.
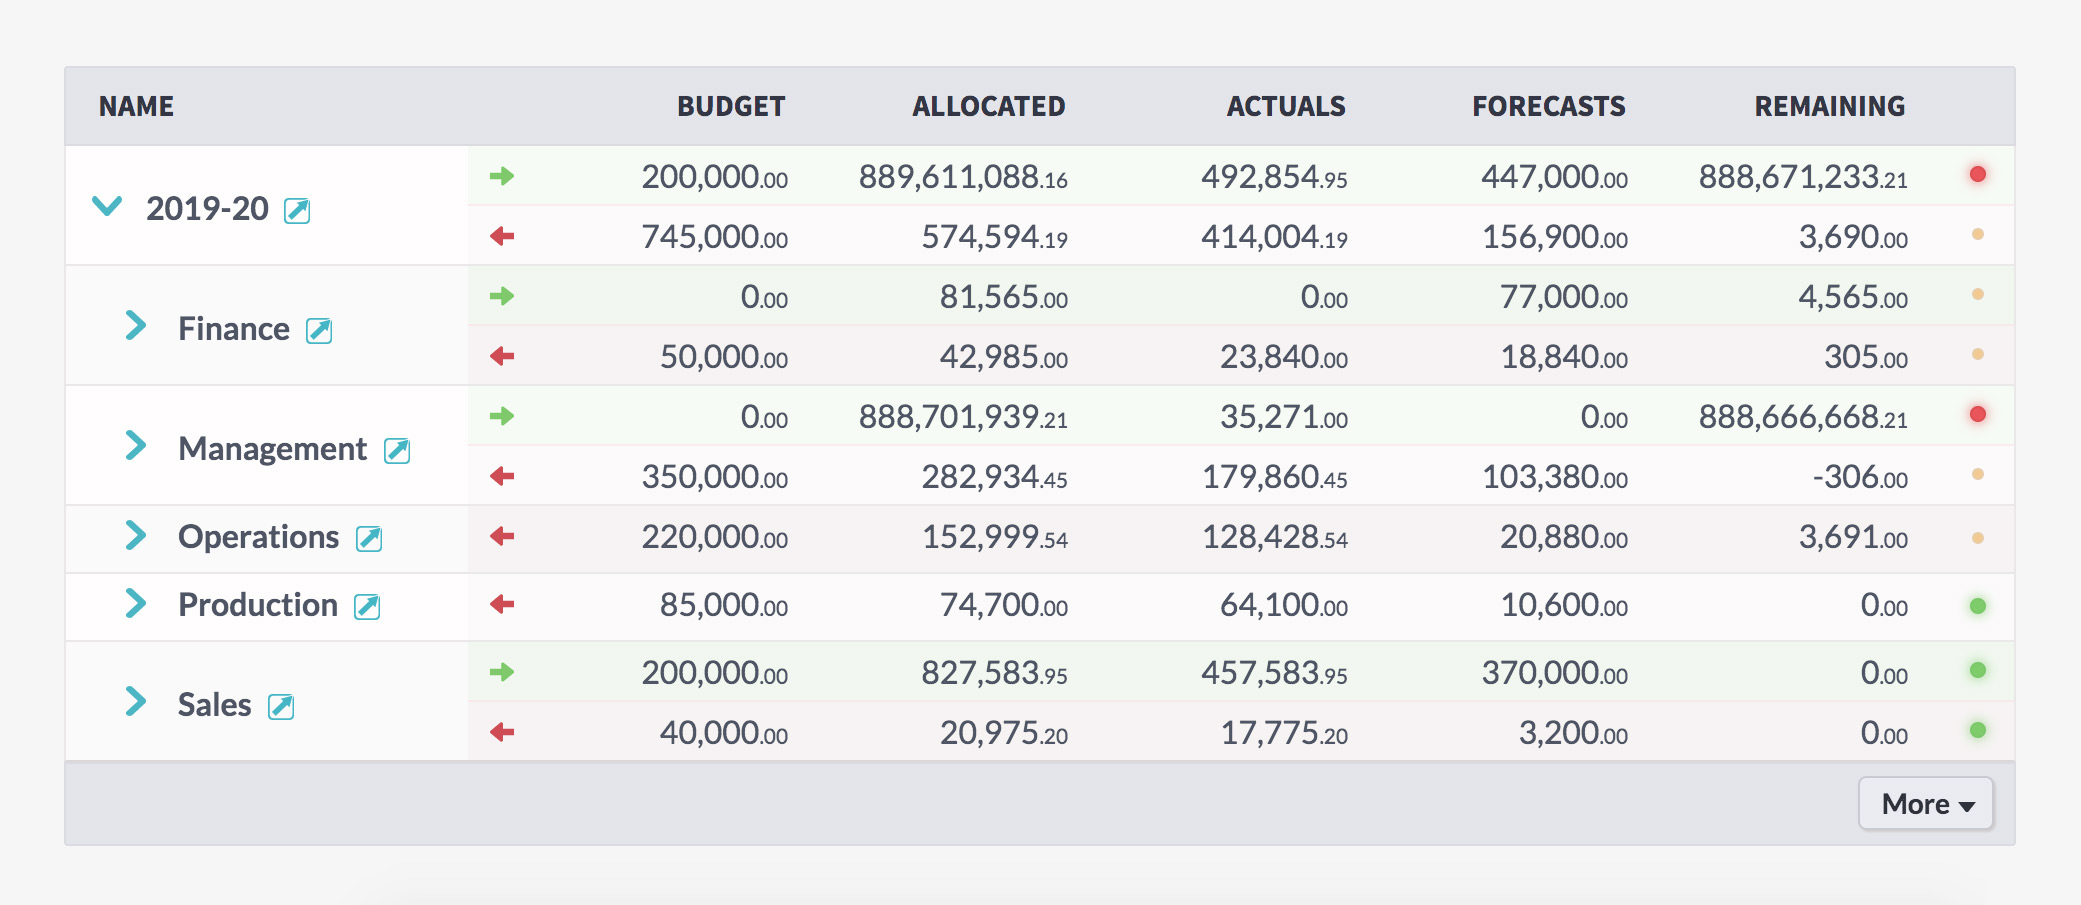
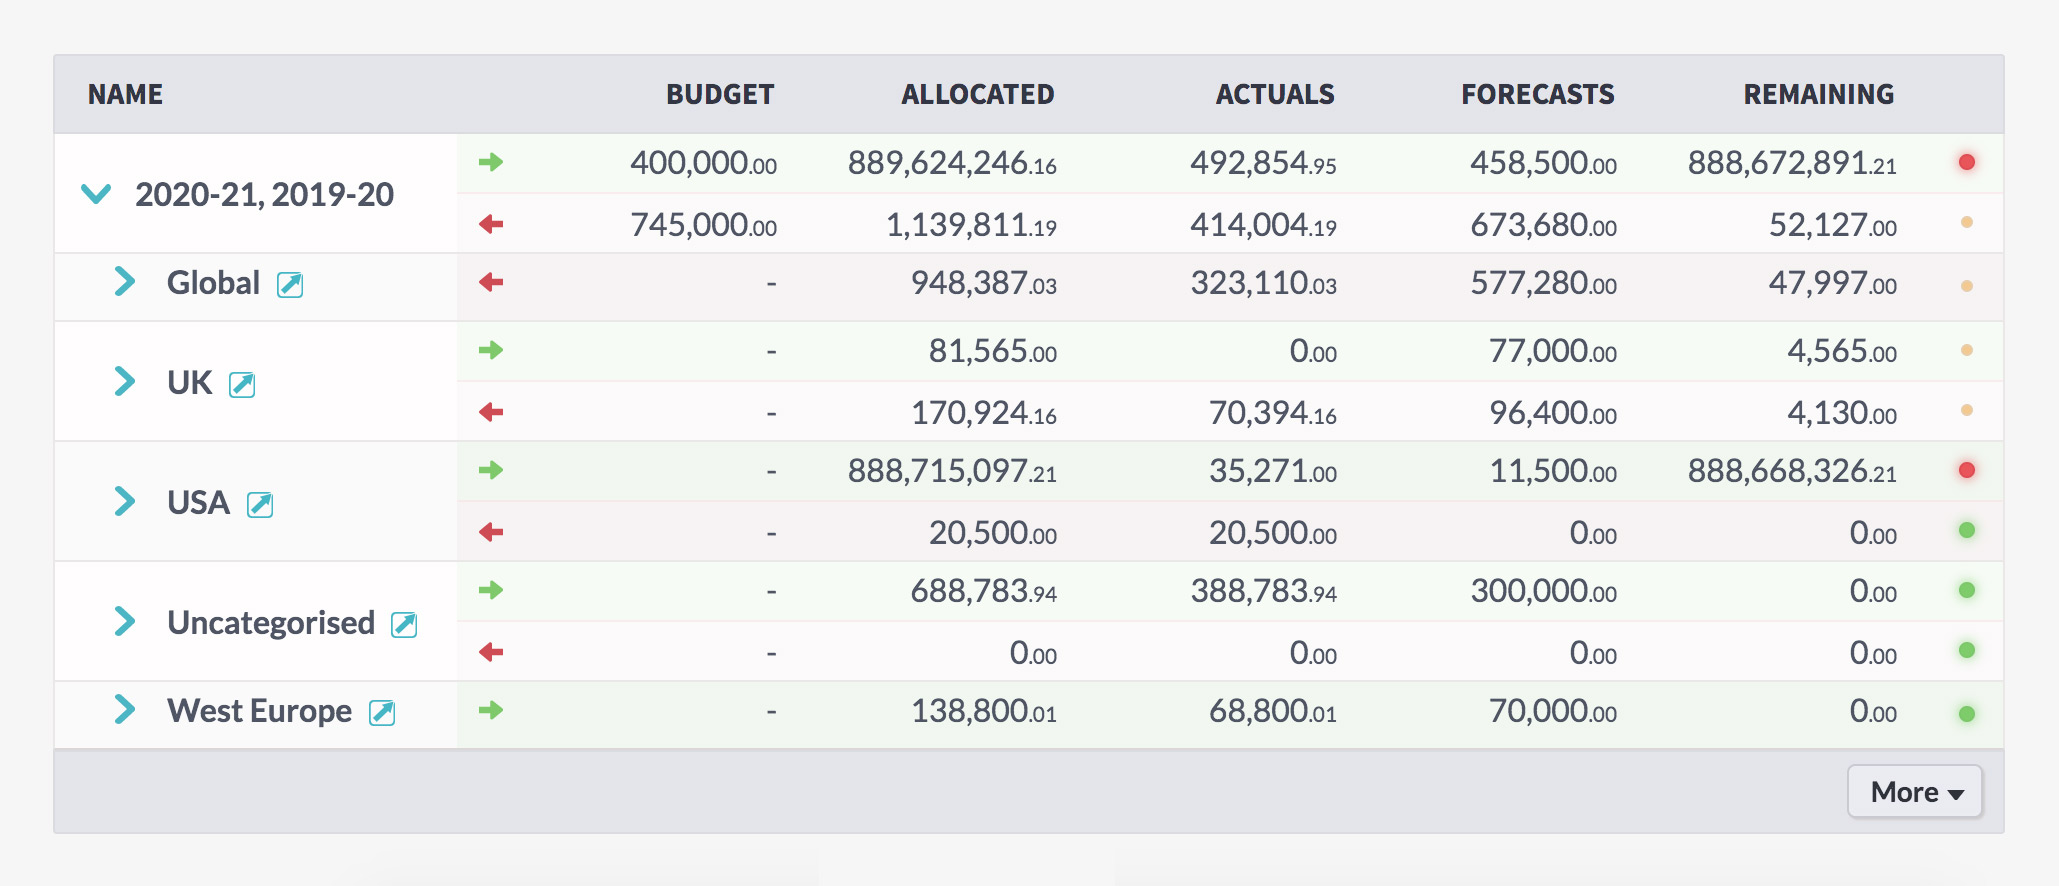
You can see the high-level details on the report itself – budget, allocated, actuals, forecasts, and remaining amount.
You can also see a status indicator for each section of the plan, showing if it’s over or under budget, so you can see which sections need attention.
View the report however it most makes sense to you
The report has toggles for ‘display’, ‘type’, and ‘view’ which you can change to see what’s most relevant for you.
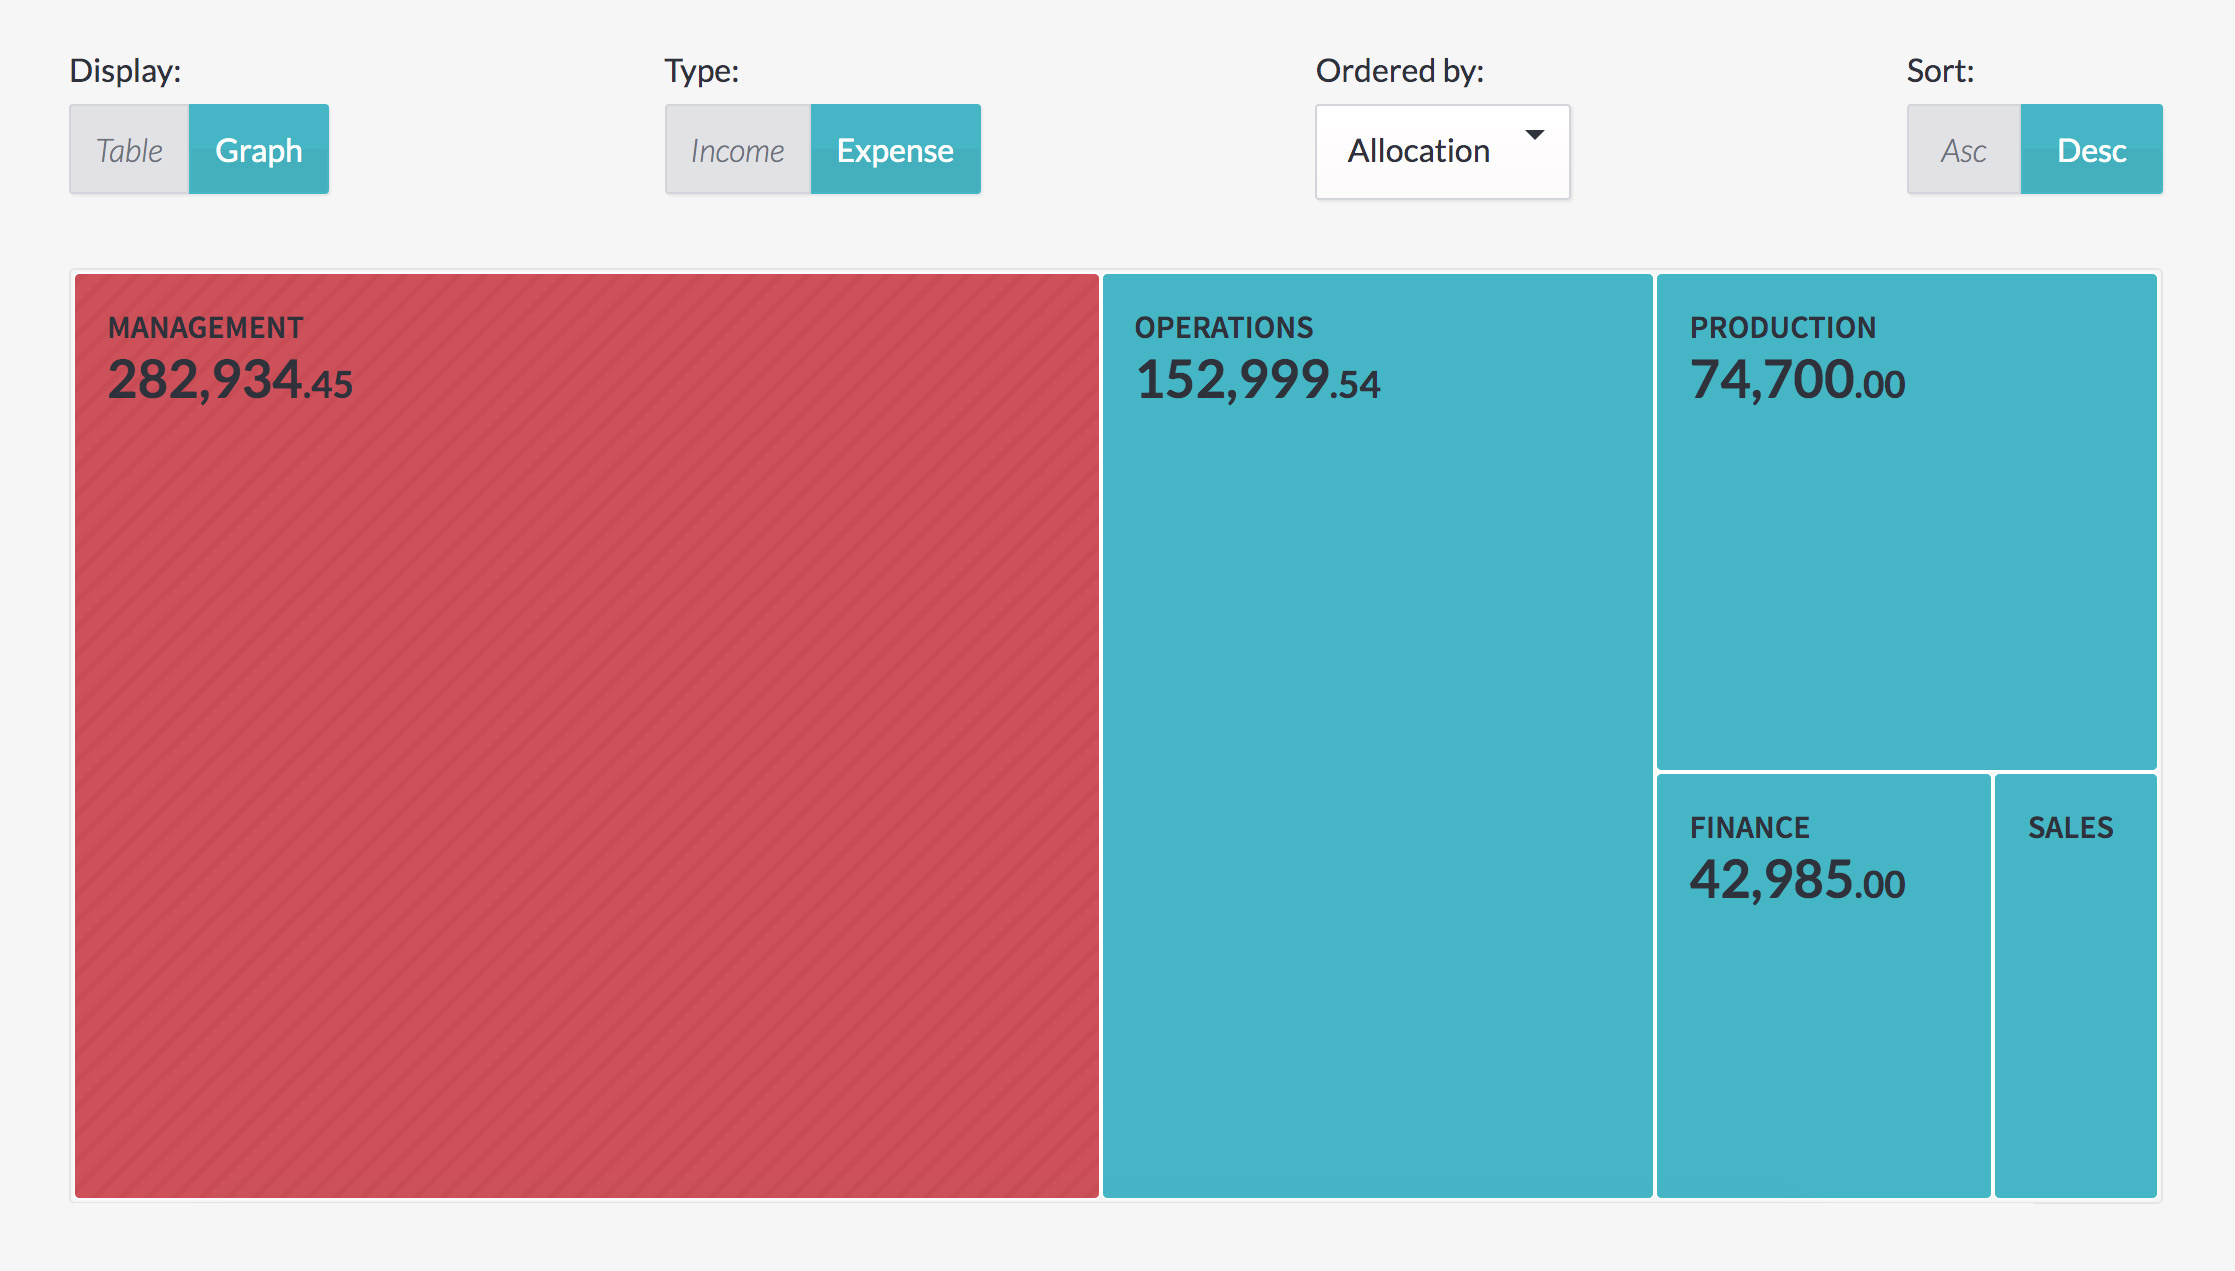
Switch between a number-heavy table layout, to see the nitty-gritty details, or a graph if you prefer to see things more visually.
Focus on just the income or expense, under ‘type’, or click ‘both’ to see a full view of your business.
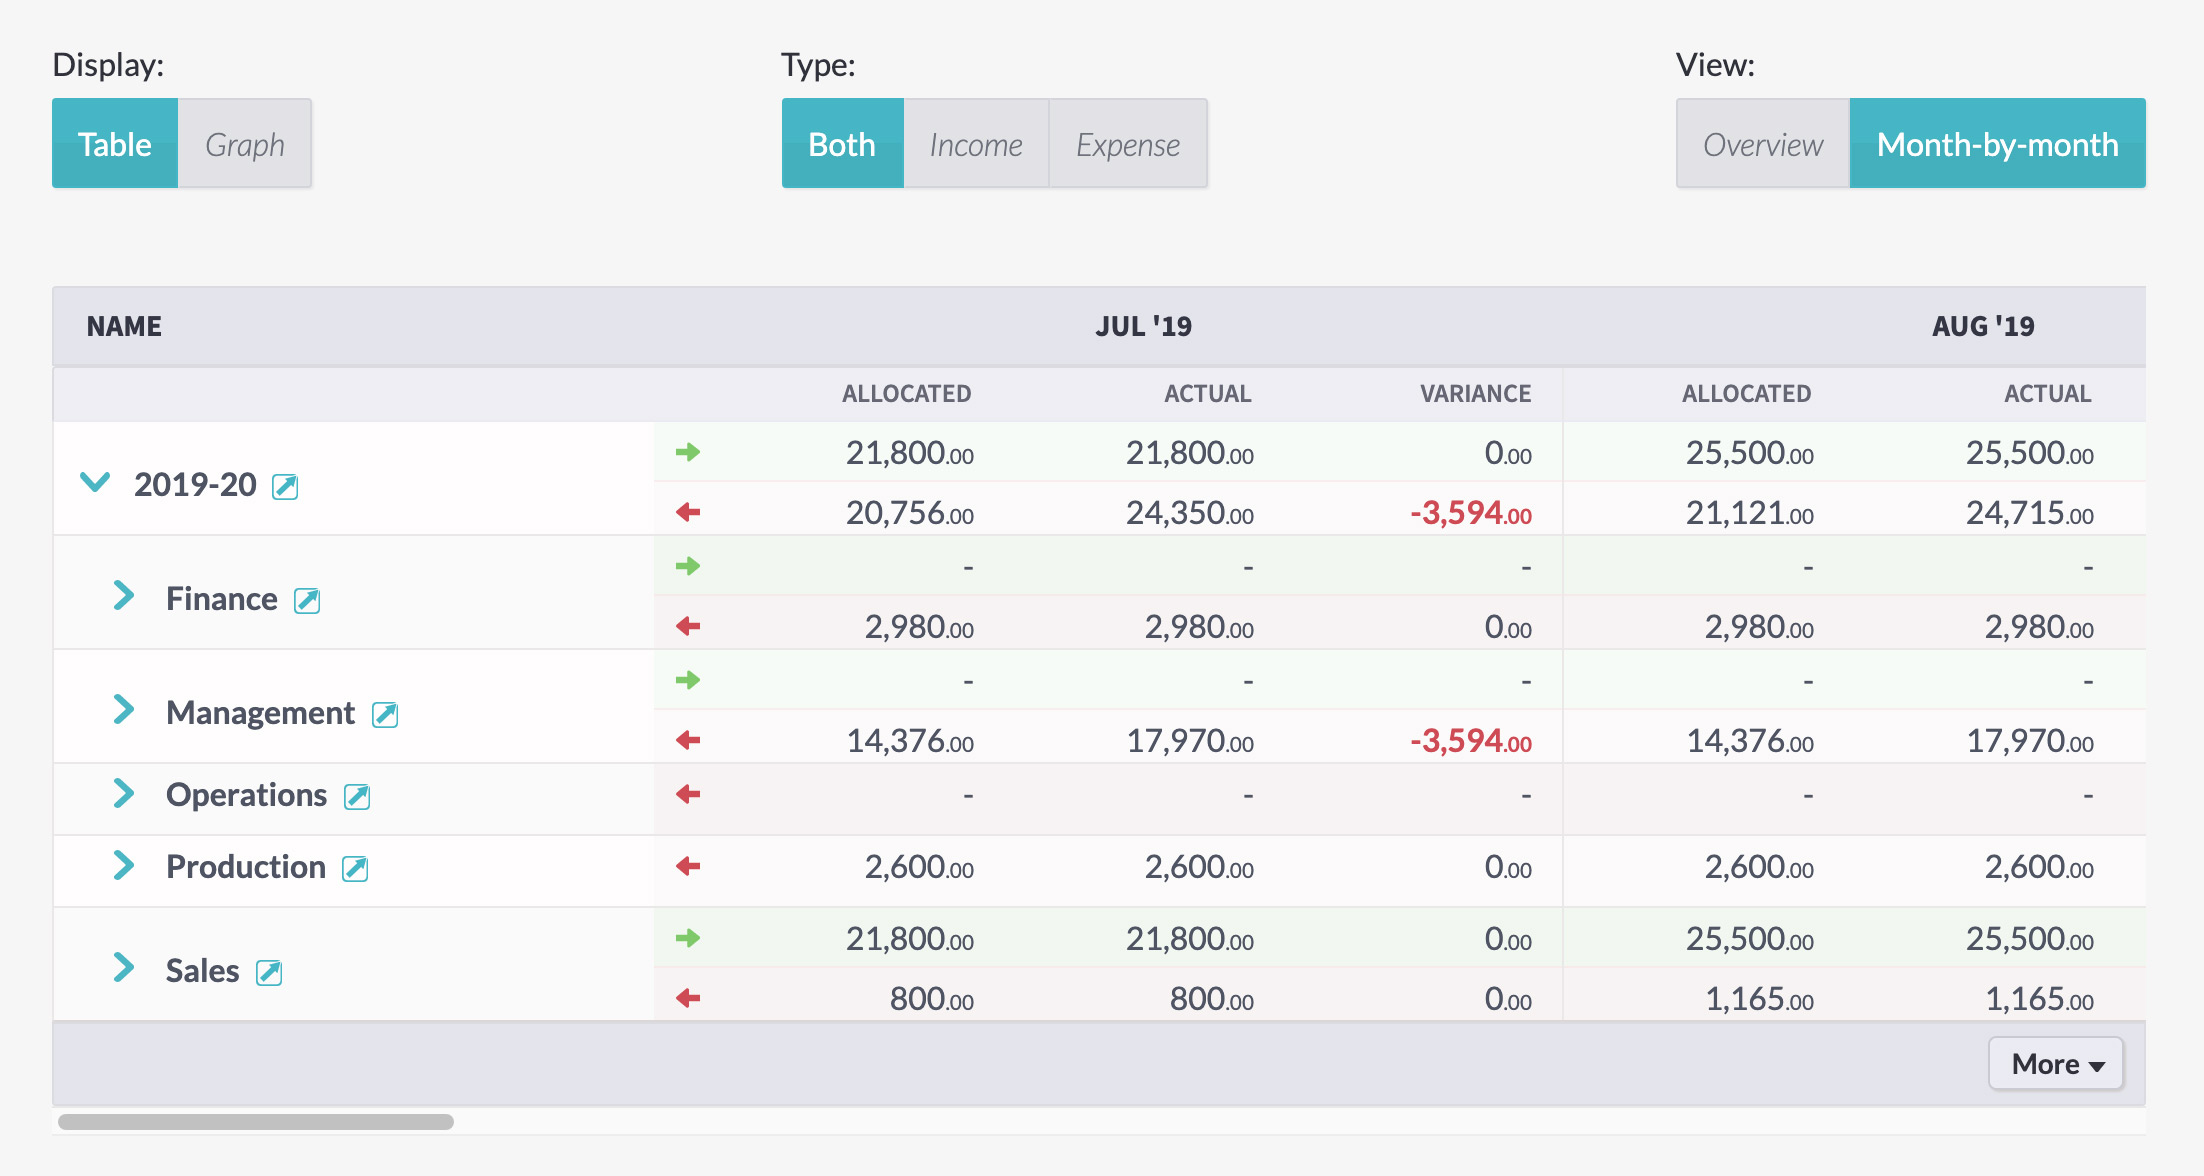
And click ‘month-by-month’ to see the figures broken into their allocated, actual, and variance figures for each month across the life of the plan, rather than the zoomed-out ‘overview’ of the budget.
And, of course, you can export your data to a .CSV file if you need to take it out of Beyond by clicking the ‘more’ button at the bottom of the report.
Profit and loss reports
And you can see more than the allocated and actual figures in your report – you can see a full profit and loss breakdown of your plan by clicking the ‘profit & loss breakdown’ tab at the top of the page.
At the top of the screen, you’ll see options for ‘company’ and ‘plan section’, allowing you to look across everything or to delve into particular details.
Hit ‘generate report’ to see how the figures breakdown into turnover, profit, and costs.

Viewing multiple plans in a single report
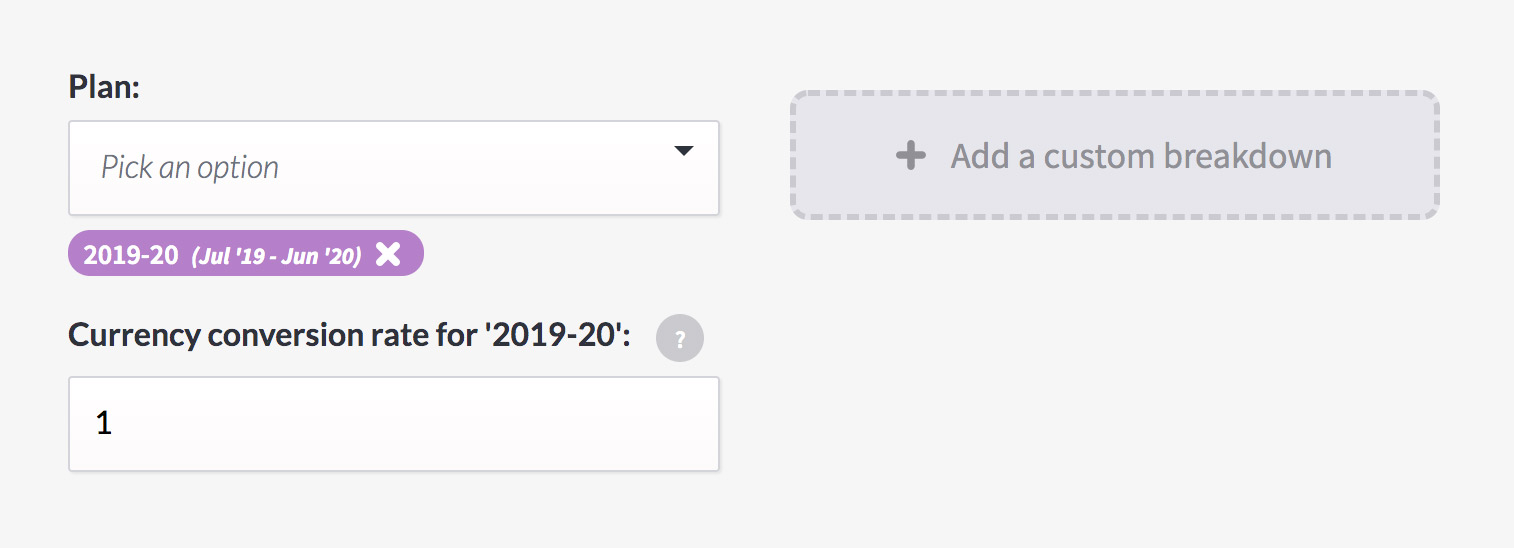
You can choose as many current, upcoming, and past plans as you’d like to see from the ‘plan’ dropdown.
Click the cross by a plan’s name to remove it from the report.
By default, the report will be broken down by the top level of each plan, showing each plan in separate sections.
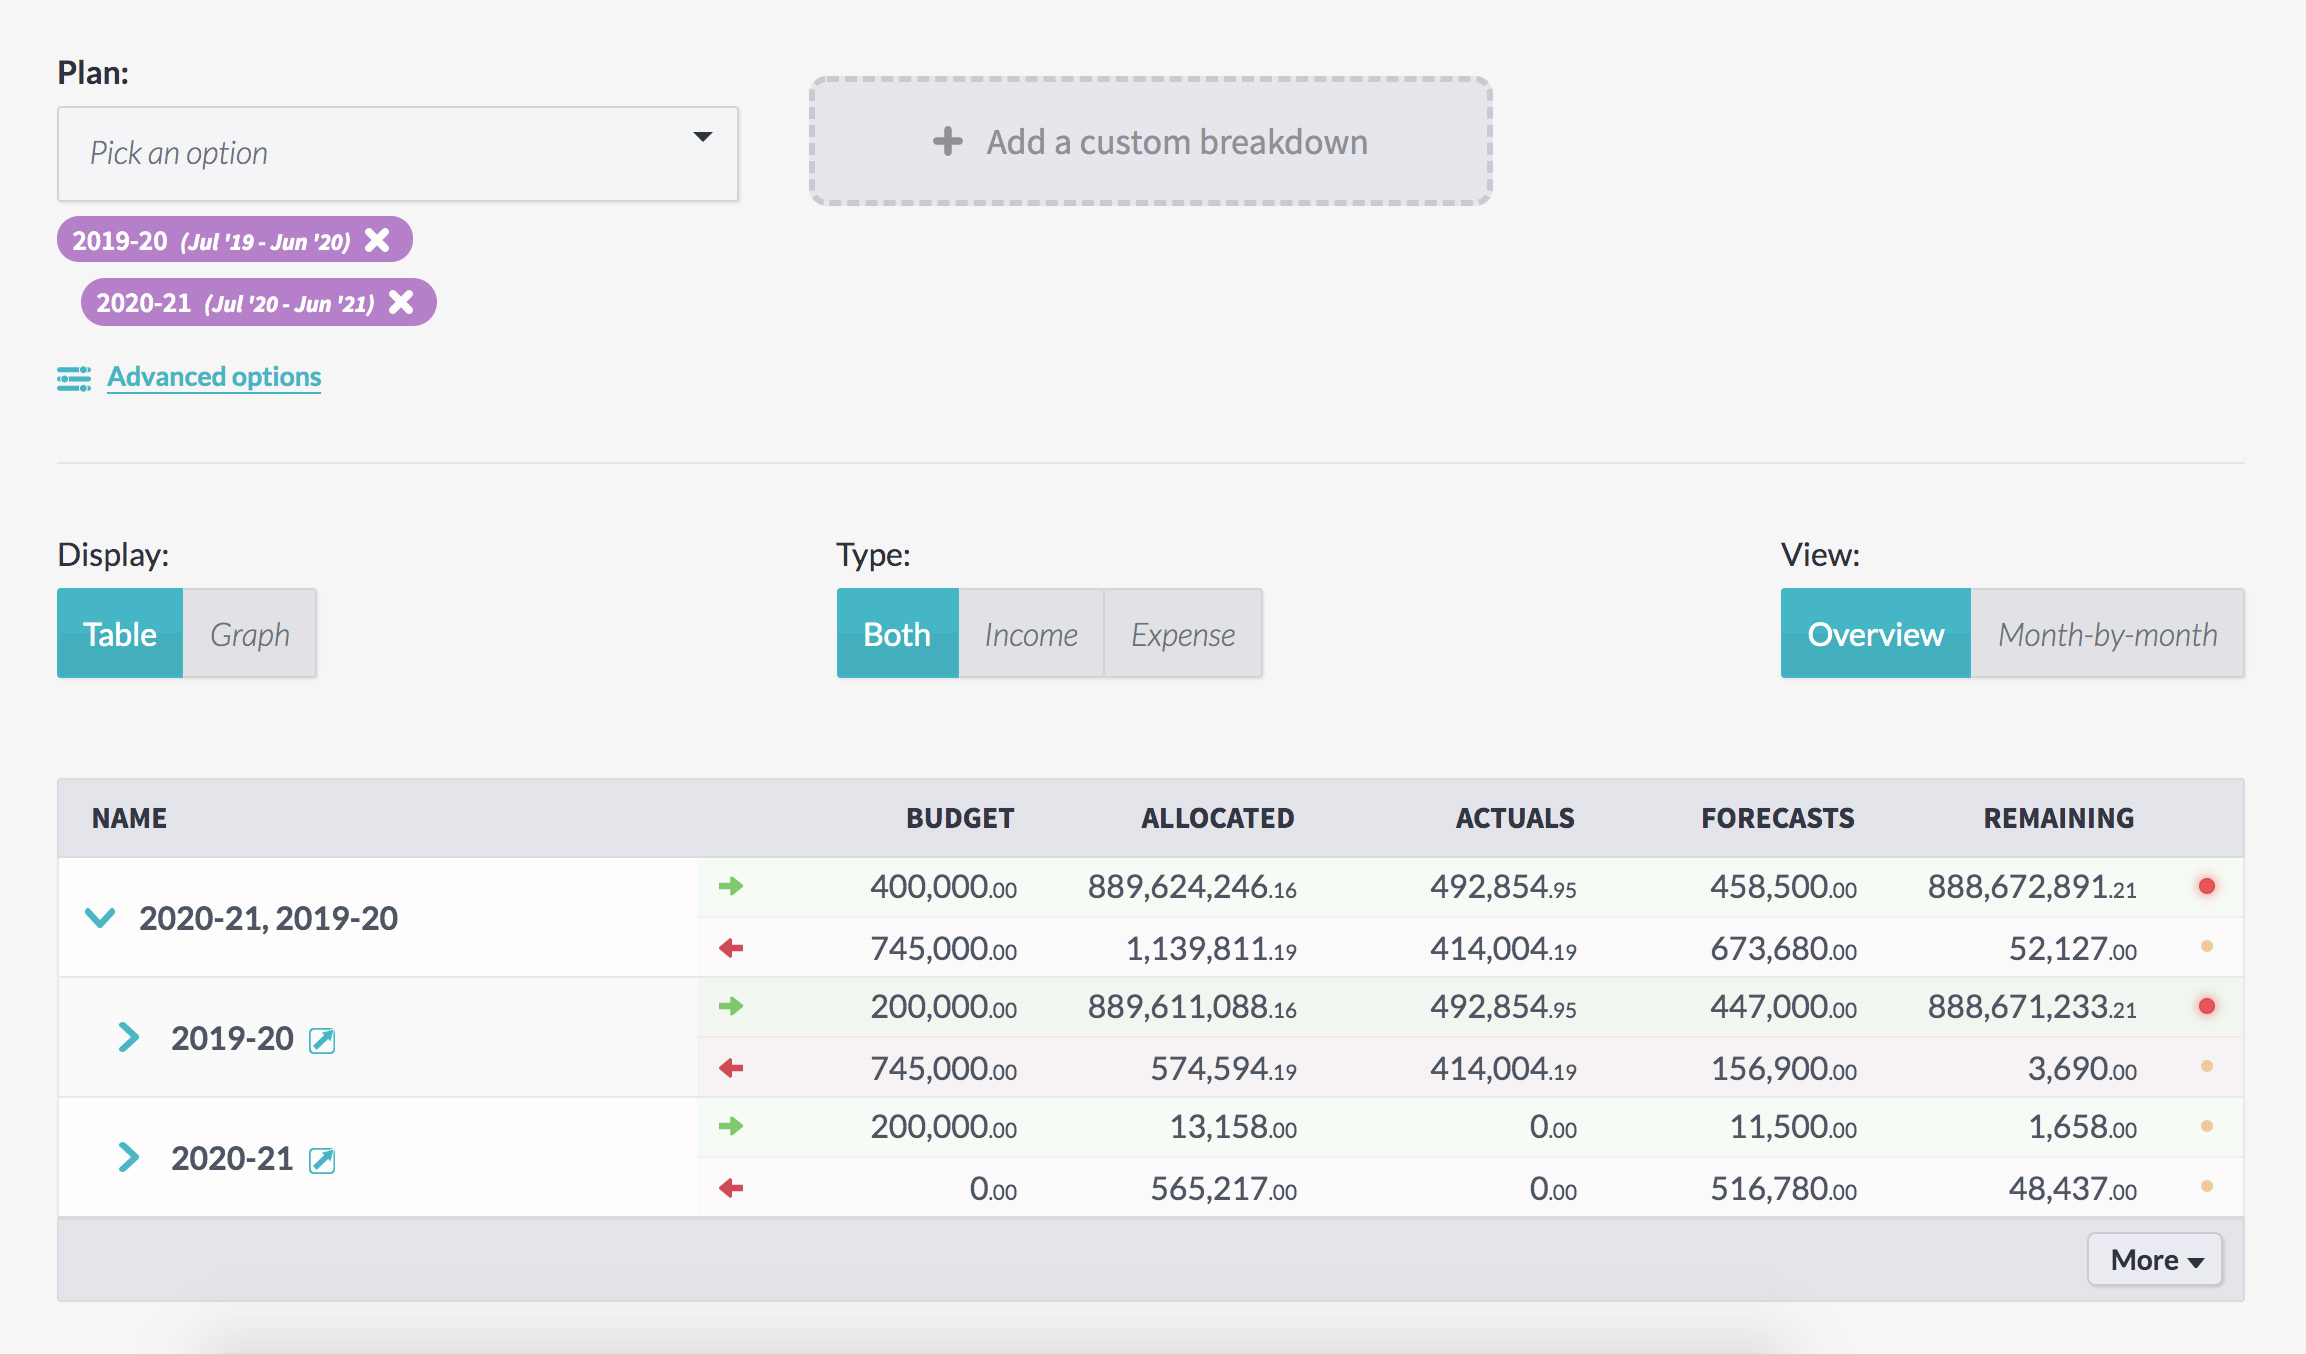
You can compare plans more closely by choosing a custom breakdown.
Custom report breakdowns
You can split the report by different sections and values by choosing a custom breakdown.
Click the ‘add a custom breakdown’ box next to the plan dropdown field to see the breakdown options. You can choose a different plan section level or an activity category.
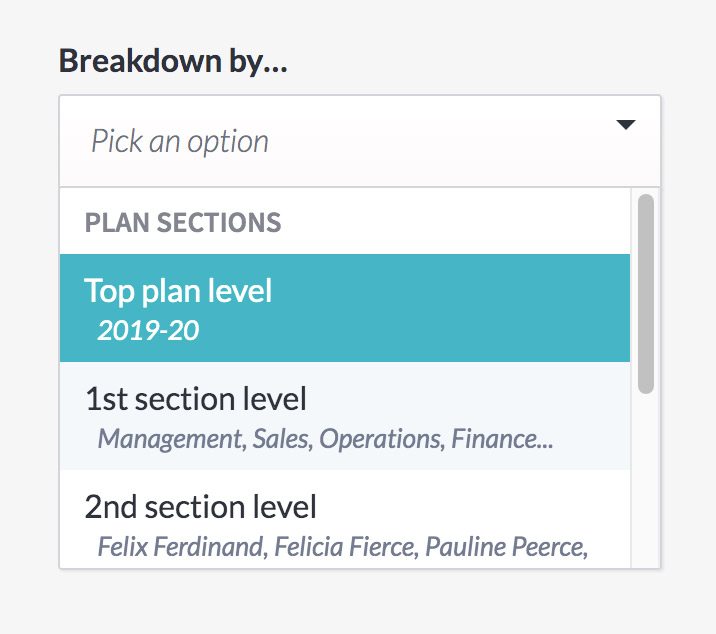
Breaking reports down by plan section level
Plan section levels are all the plan subsections at that level of their plan.
For example, here, the 2019-2020 plan is broken into five subsections. These are at the first level.

Each of those subsections either have their own subsections – the second level – or have activities.
If you wanted to see a report on two different plans, starting from their second level, the report would begin with the subsections of the subsections directly inside the parent plan.
You’d still be able to see this detail starting from higher up, though you’d need to drill into each subsection.
Looking across multiple plans, any plan subsections which share a name on the same level will be merged together, so you can track plans across different financial years or merge plans budgeted in different currencies.
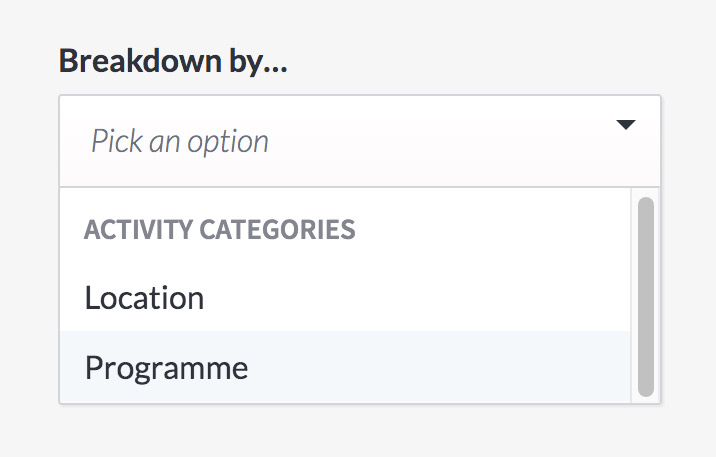
Breaking reports down by activity category
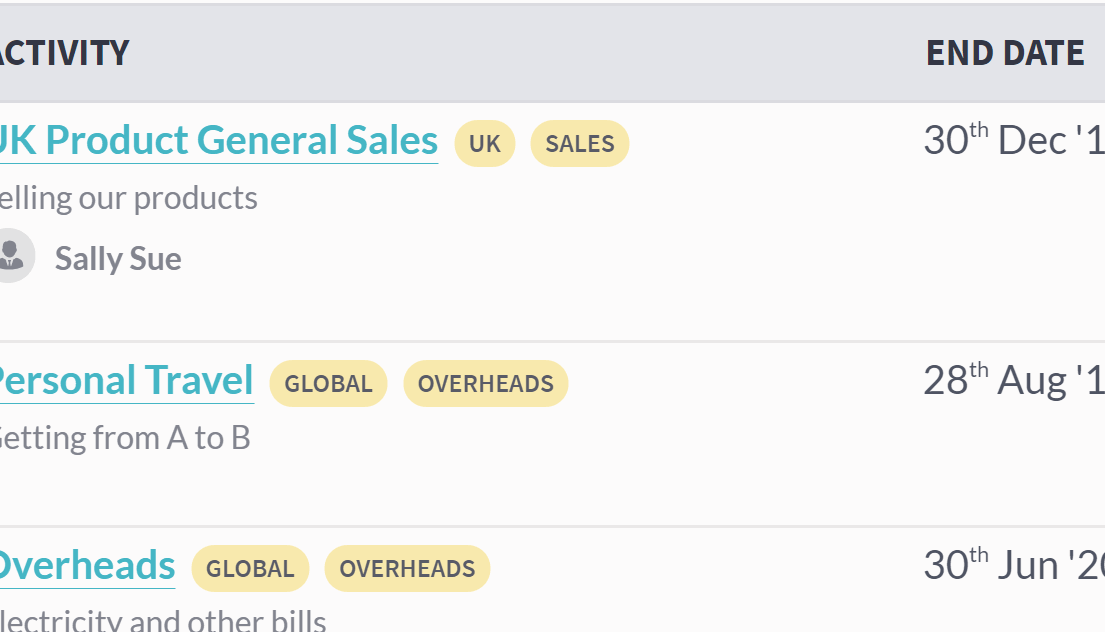
Activity categories are a way to structure and organise activities across your company in whichever way makes the most sense to you.
For example, a multinational business might want a ‘location’ category, with options for ‘Asia’, ‘North America’, and ‘Europe’. Users would be asked to choose which location their activity belongs to when they make one.
With activities structured and organised this way, we can easily breakdown reports by location. (Or by initiative, department, function, client, favourite colour…)
Once your activity categories have been set up by power users on the ‘settings’ page, you’ll see an ‘activity categories’ section at the bottom of the breakdown dropdown field.
Select a category to see the report broken down by that category’s options.
Creating a detailed breakdown
You can go as in-depth as you’d like to, selecting multiple section levels and multiple activity categories by pressing the ‘add another breakdown’ button.
And you can tweak and re-run the report as you need, to get a full picture of what’s happening. Breakdown the financial year by department first and location second – then run a new report, breaking down by location first, department second, to get a full, 360 picture of exactly what’s happening across your organisation.
Compare plans in different currencies
But seeing multiple plans on the same report goes deeper than keeping everything on one screen – if you have plans in different currencies, for a multinational business, you can convert them into the same currency to easily compare how different parts of the business are running.
Click ‘advanced options’ at the bottom of the report form to see a currency conversion rate for every plan you’ve chosen. You can manually set this to whatever you need, for complete control over how the numbers in the plan will be presented.
Setting the rate to ‘1’ won’t change anything. ‘2’ will double the amount. ‘0.75’ will reduce the figures by 25%.
This is also handy for running reports for your plans in a different currency. If you need to show American investors how their dollars are working, changing the rate to the conversion amount, like 1.24, will convert a GBP plan into USD.
See what’s really happening in your business
Run a breakdown report now to see what’s really happening in your business.
And, if you have any ideas or suggestions for other management tools you’d like to see, let us know! We’re here to make budgeting easier for you. (Yes, you specifically.)
The post Feature spotlight: breakdown reports appeared first on Beyond.
]]>The post Feature spotlight: automatic rules appeared first on Beyond.
]]>Rules automatically assign new transactions to the right activities and plans, and save you time.
Over 99% of the actuals a typical company brings into Beyond are assigned automatically by actuals, without staff needing to review them – that’s hundreds of hours freed up for more important work.
Spend two minutes setting up a rule and save hours of your time for the work you want to focus on. (Or tea breaks. We won’t judge.)
Rules on Beyond
There are two types of rule:
Accounting rules affect every new transaction that comes in from your accounting software. They can only be made by accountant power users, and they can be used to assign actuals anywhere in the business.
Plan rules affect new transactions that come into a particular plan, and can be set up by that plan’s owners to assign actuals to activities inside that plan.
The rules can be used together. For example, an accountant might set up rules to assign everything from the marketing account code to the marketing section of the current plan budget.
But different actuals will belong in different activities that the accountant can’t know the ins and outs of – so the marketing team can create rules based on the supplier and the description to automatically put the right actuals into the right activities.
The budget stays up-to-date – and everyone can focus on more important work.
Creating a new rule
Making a new rule is kuh-wick, with a K.
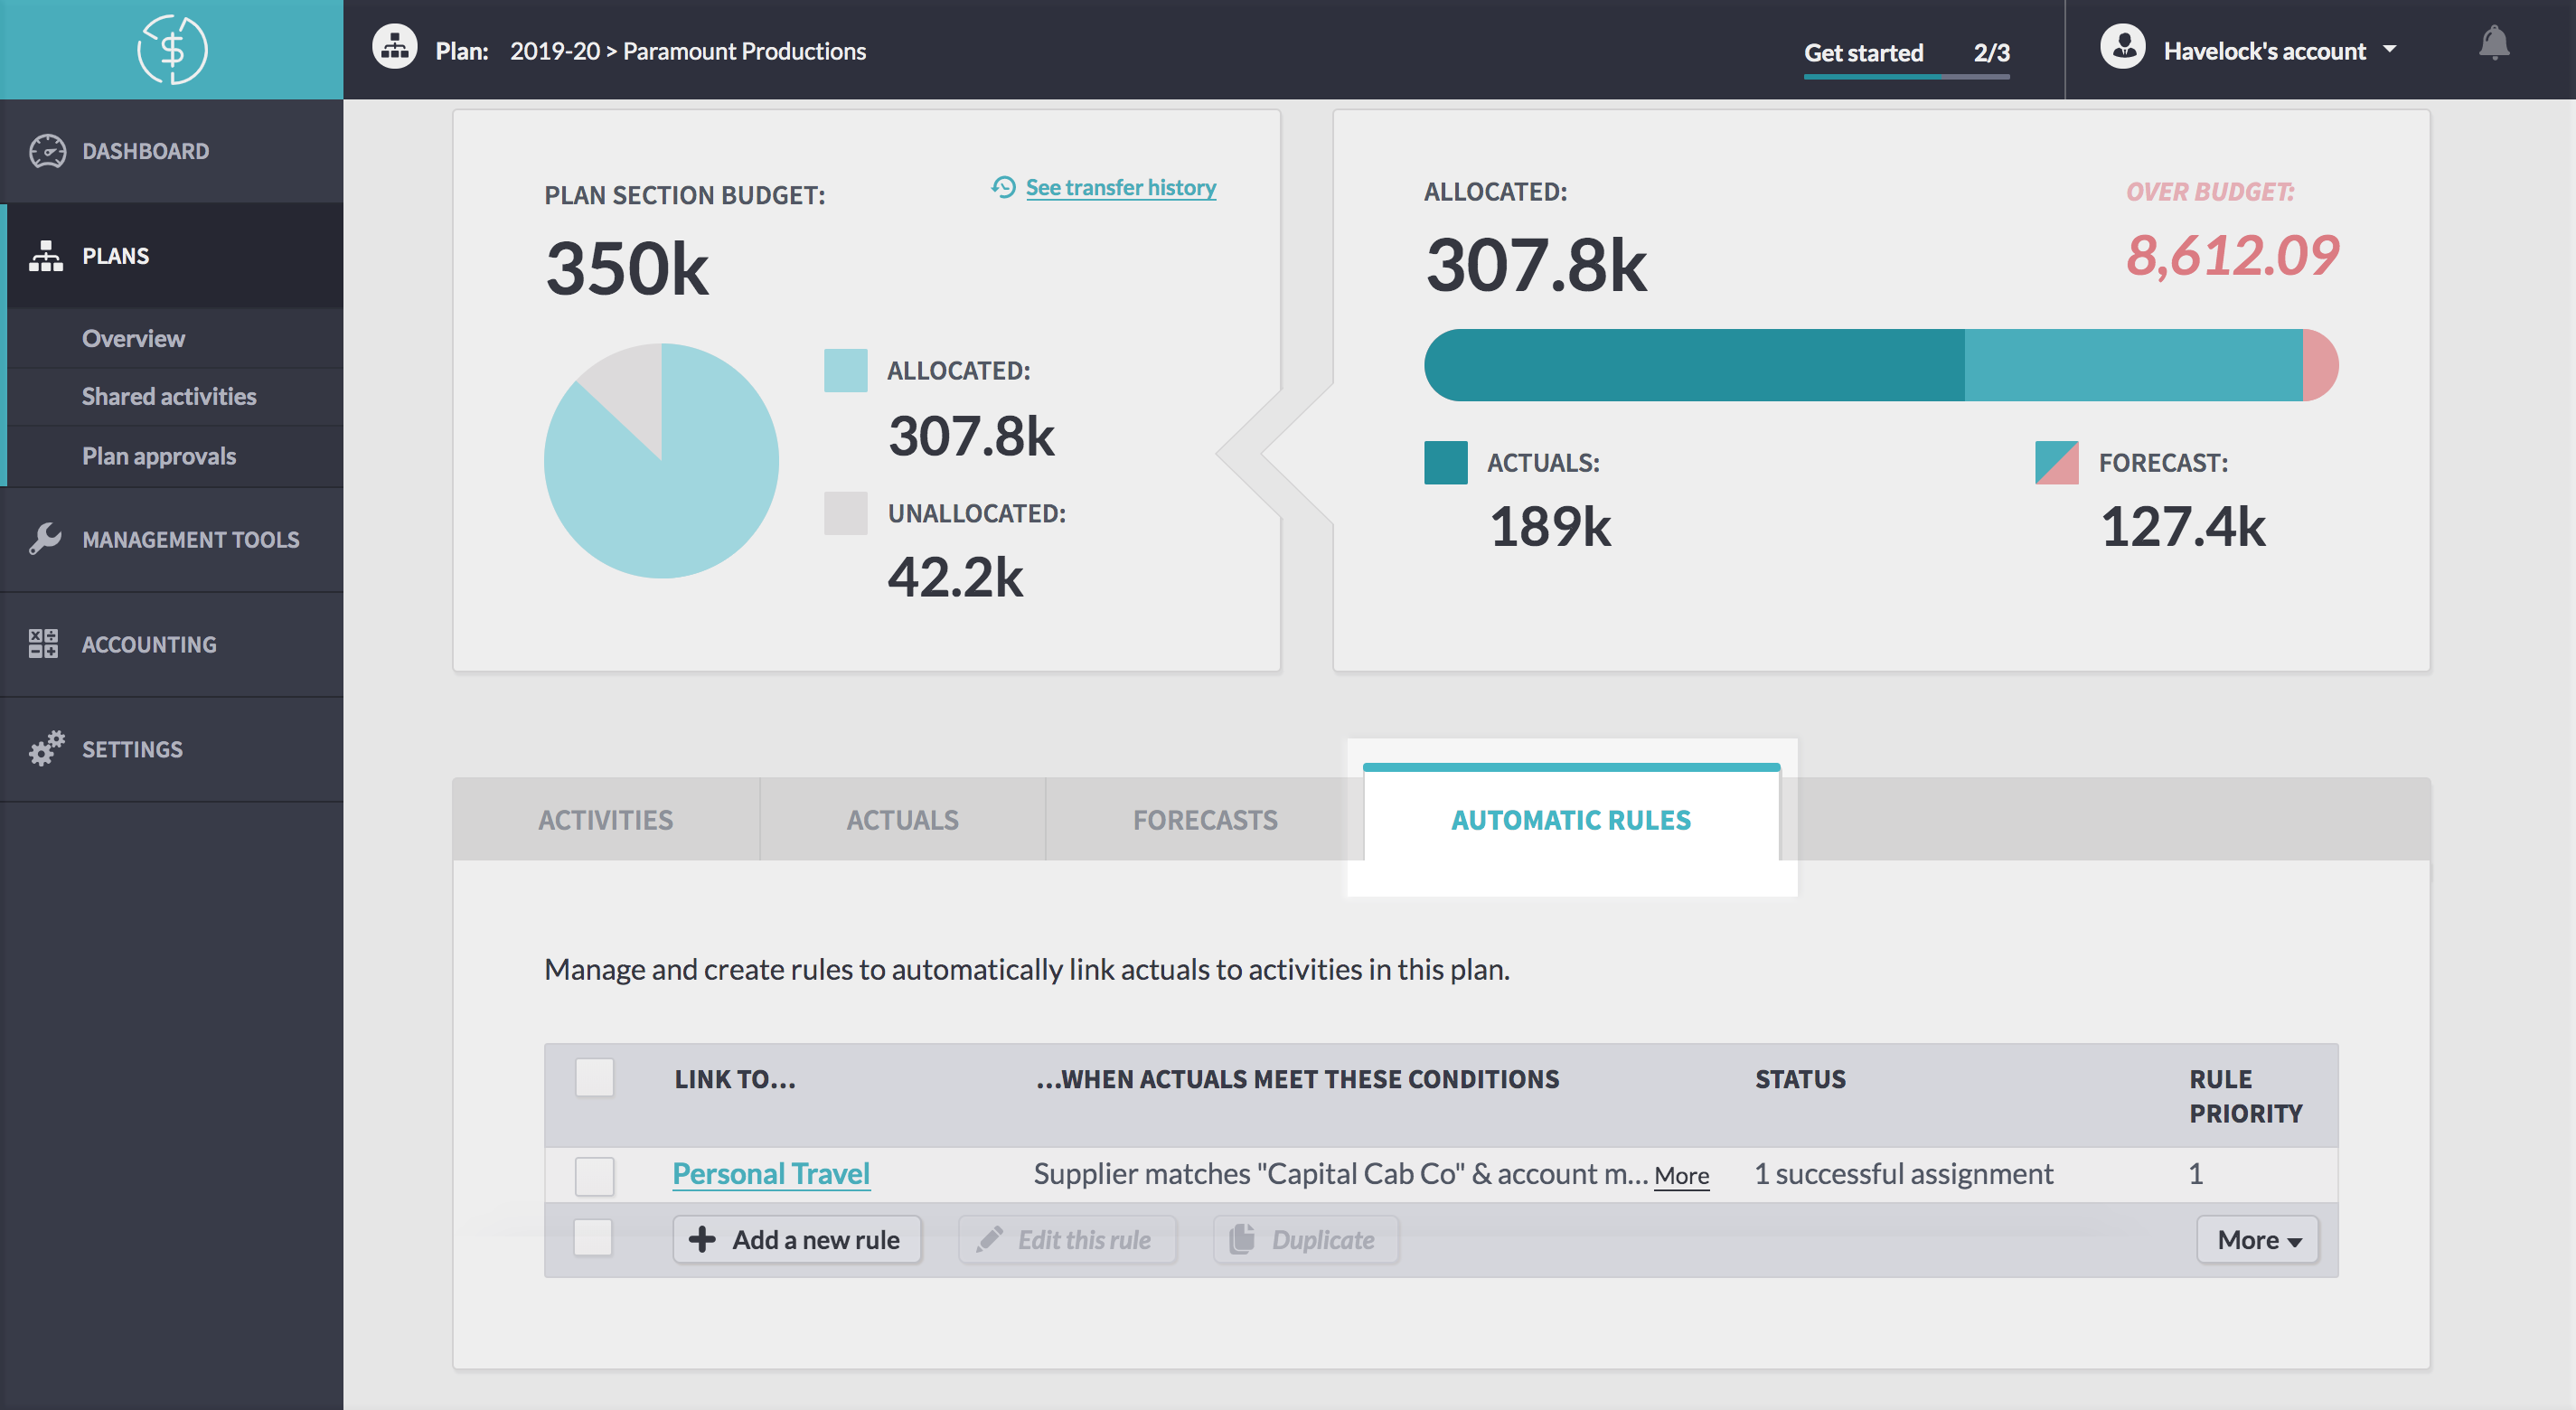
Step 1
First, open the ‘automatic rules’ page in the accounting section, or go into an individual plan and click on the ‘automatic rules’ tab.
Step 2
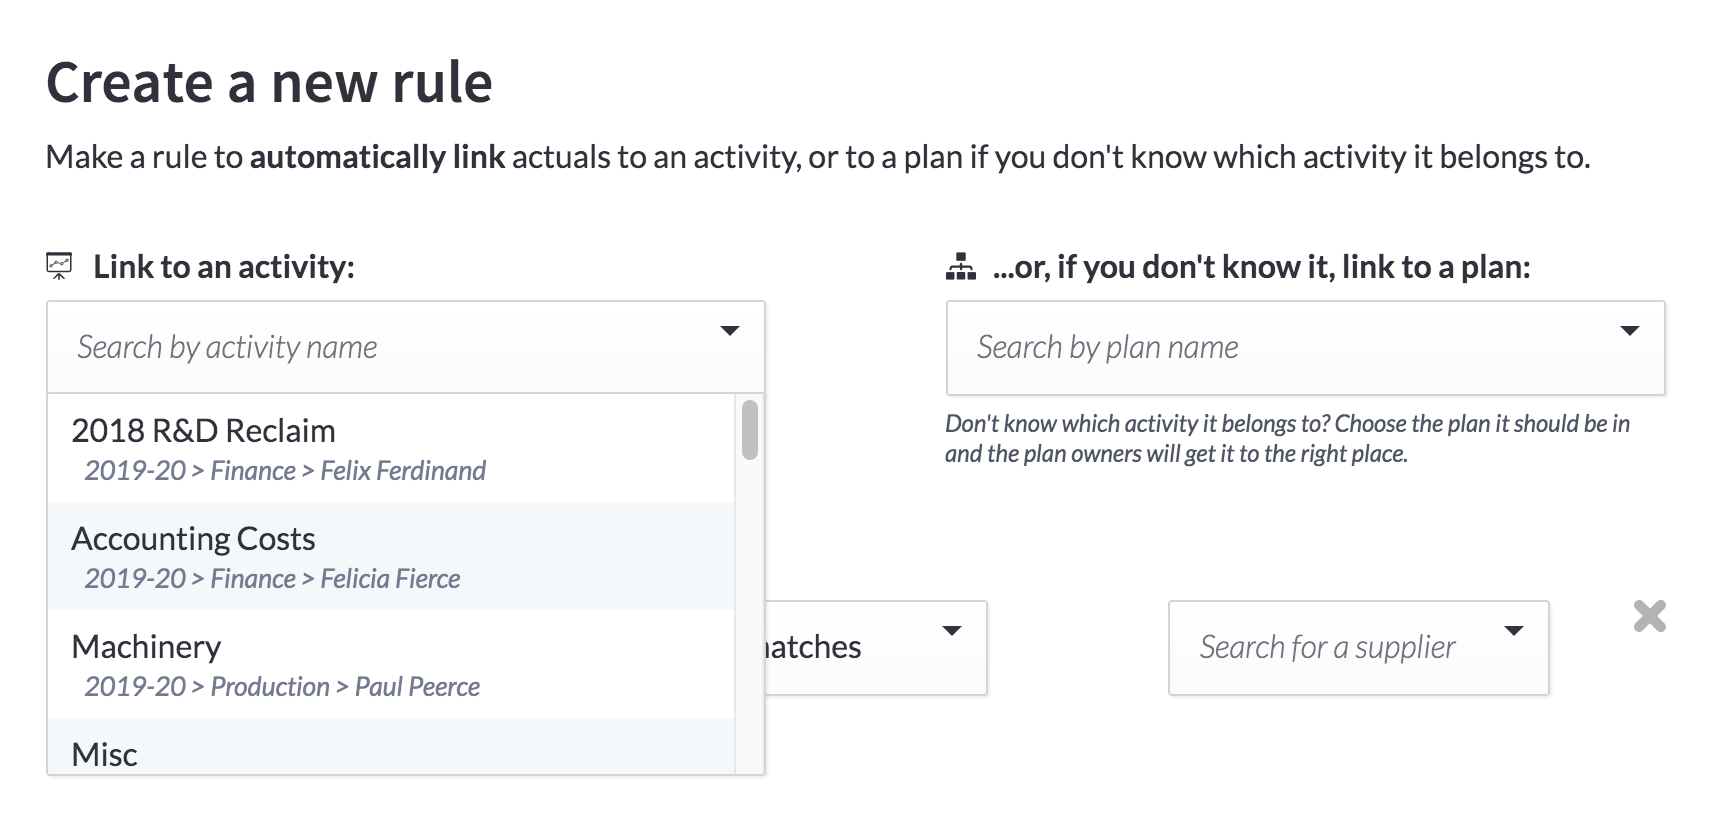
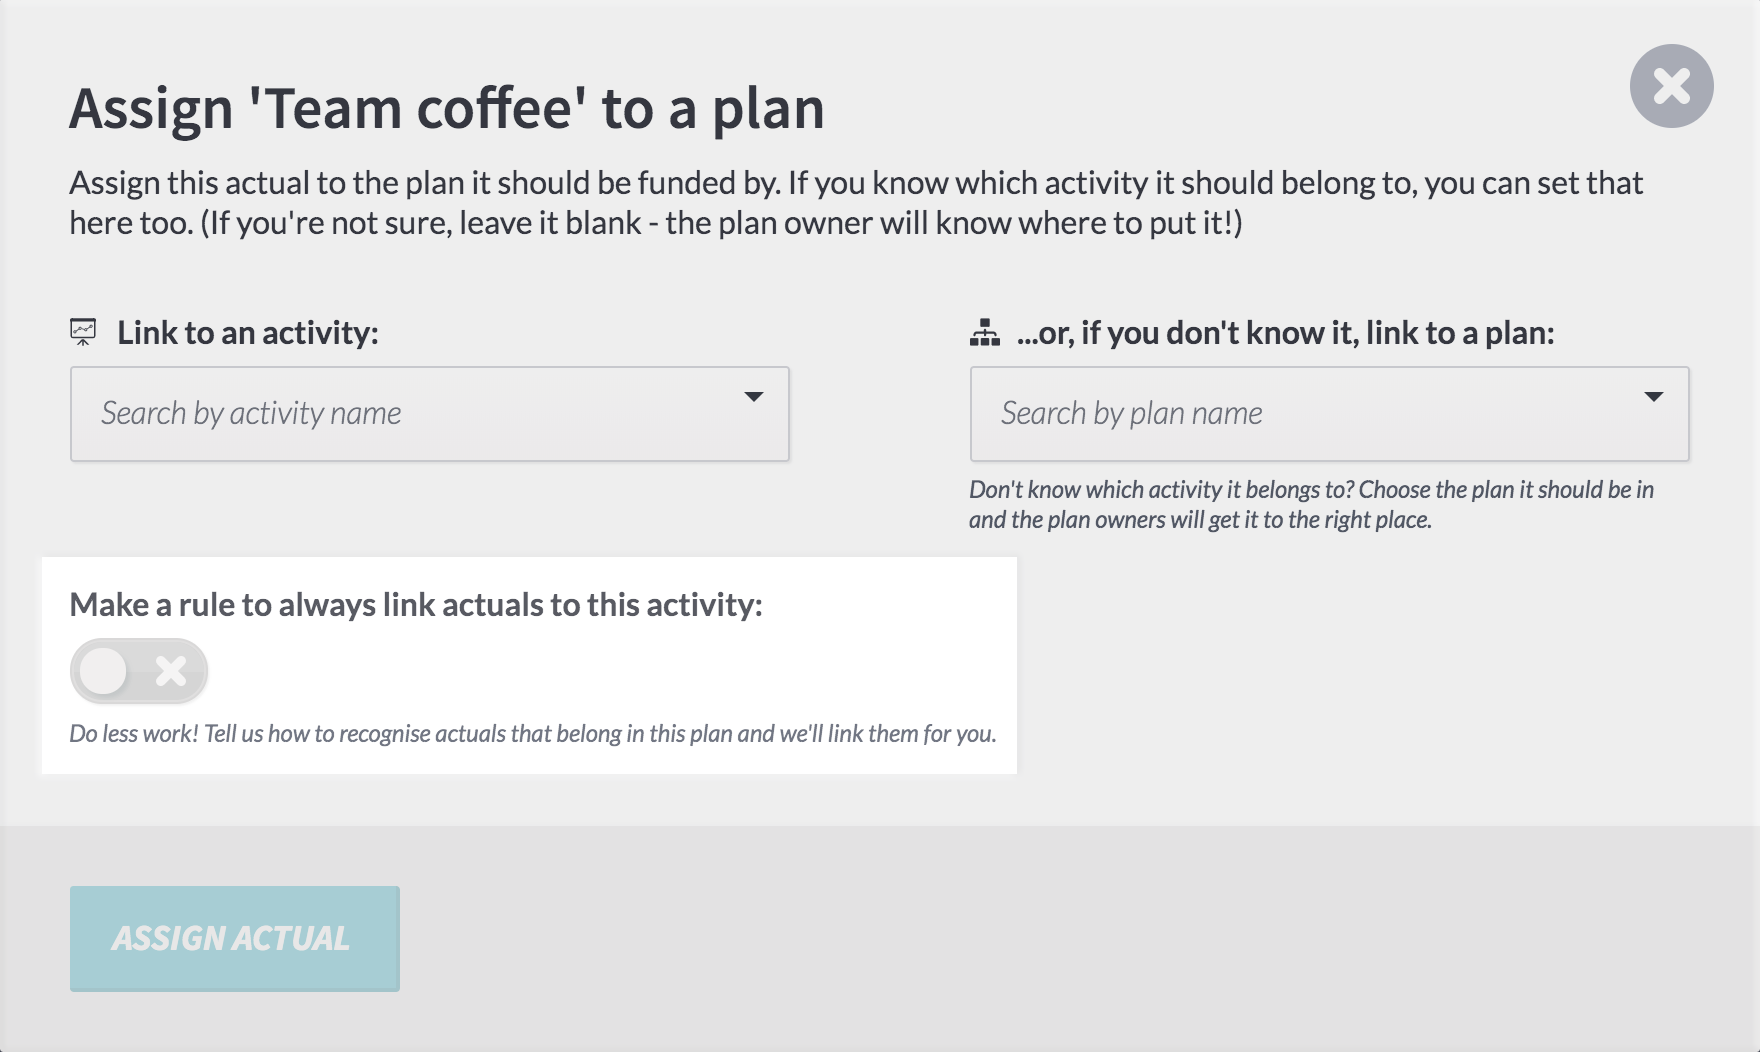
Click the ‘new rule’ button and tell us where you’d like actuals to be moved to when they meet the right conditions.
You can link directly to an activity if you know it, choosing from a list across the business. Just start typing to filter the list – it’s going to be big!
Or, if you don’t know exactly where it’s going, link it to the plan for the plan owner to move later.
You can also park actuals which shouldn’t sit inside any plans, if you need to.
Step 3
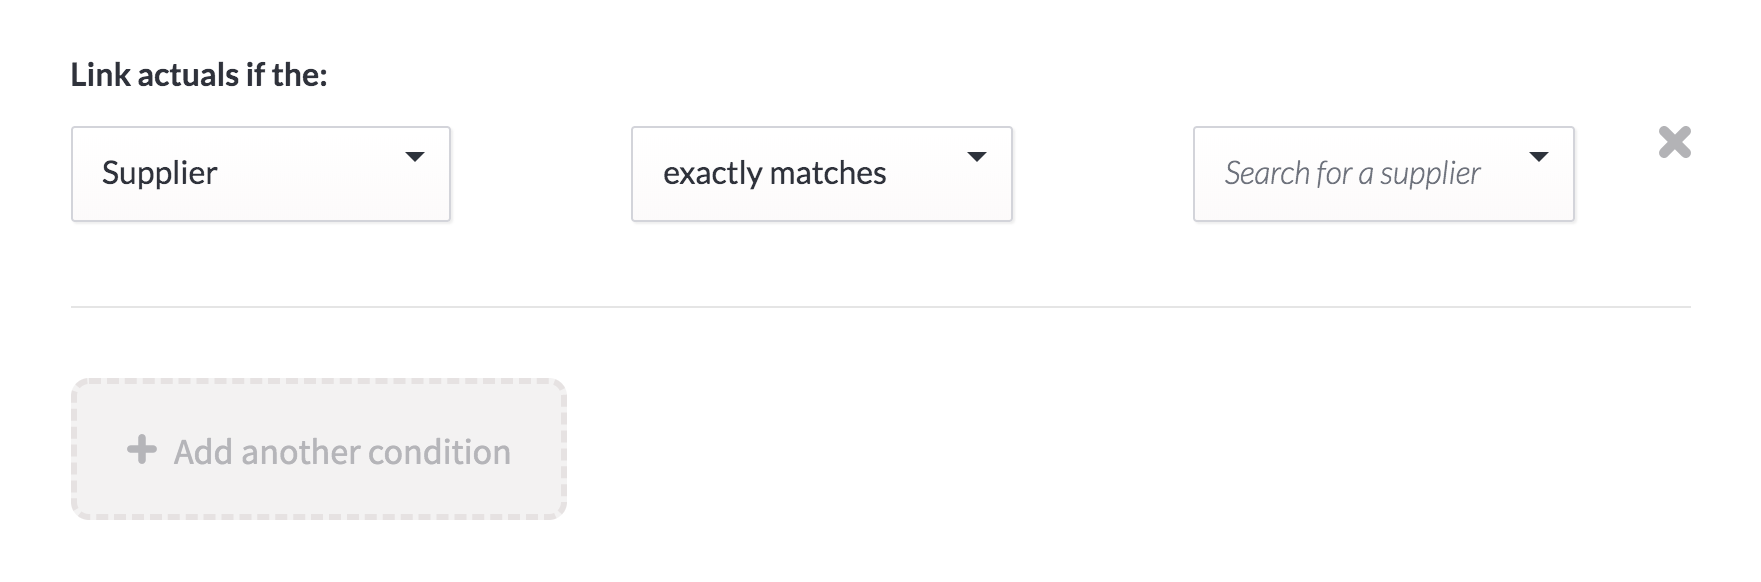
Next, tell us what conditions an actual needs to meet to follow this rule.
You can use any data that will come in from your accounting system – the supplier, the account name or code, what type of actual it is (like a pre-payment or an invoice), the description, the reference, the company it comes from, or the tracking category.
And you can be as precise as you want to be. If you’re matching on the supplier, it makes sense to choose an exact supplier name from the given list. If you’re matching on a description, you probably only care that it contains a certain word or phrase. Or maybe all the account codes for a certain plan will start with the same two numbers.
You can add as many conditions as you need to perfectly match the actuals you’re expecting. A rule will only be applied if it meets all the conditions, so it often helps to be more specific.
Step 4
Hit the ‘create new rule’ button and make yourself a cuppa. You’ve just freed up your schedule!
Or create a rule in context
Good news for accountants: you can create a new rule even quicker than that!
Hit the ‘make a rule’ button when you’re assigning an actual to create a new rule based on that actual’s metadata. Any other actuals with the same details – like the company, account name, and supplier – will be assigned to the same plan or activity.
Or you can tweak the conditions before you hit ‘assign’, taking some out to make a broader reaching rule, or adding more in for a more specific rule.
Priorities, priorities
An actual can only be affected by one rule. After all, it can’t sit in two different budgets.
But sometimes more than one rule could apply to an actual. Maybe its supplier is Advertizely – which would go into the marketing plan – but its description starts with ‘concepts’, which would usually go into the R&D plan.
Setting a priority on your rule lets you determine what should take prominence.
By default, rules are set to 1, but higher numbers have a higher priority.
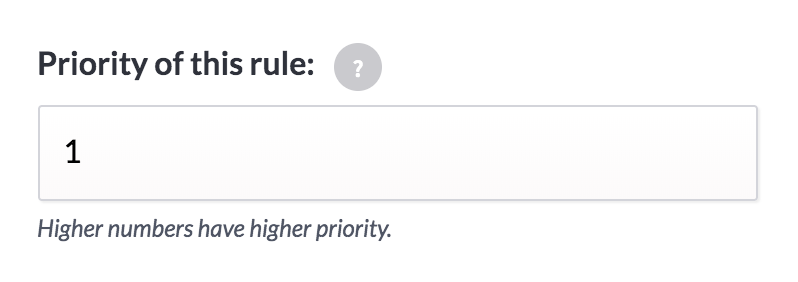
If all costs from Advertizely should be assigned to marketing, setting the priority as 100 would make sure it always takes precedence.
If rules clash that have the same priority – if both were 100 say – then the rule which has the most conditions will take prominence.
What’s the status?
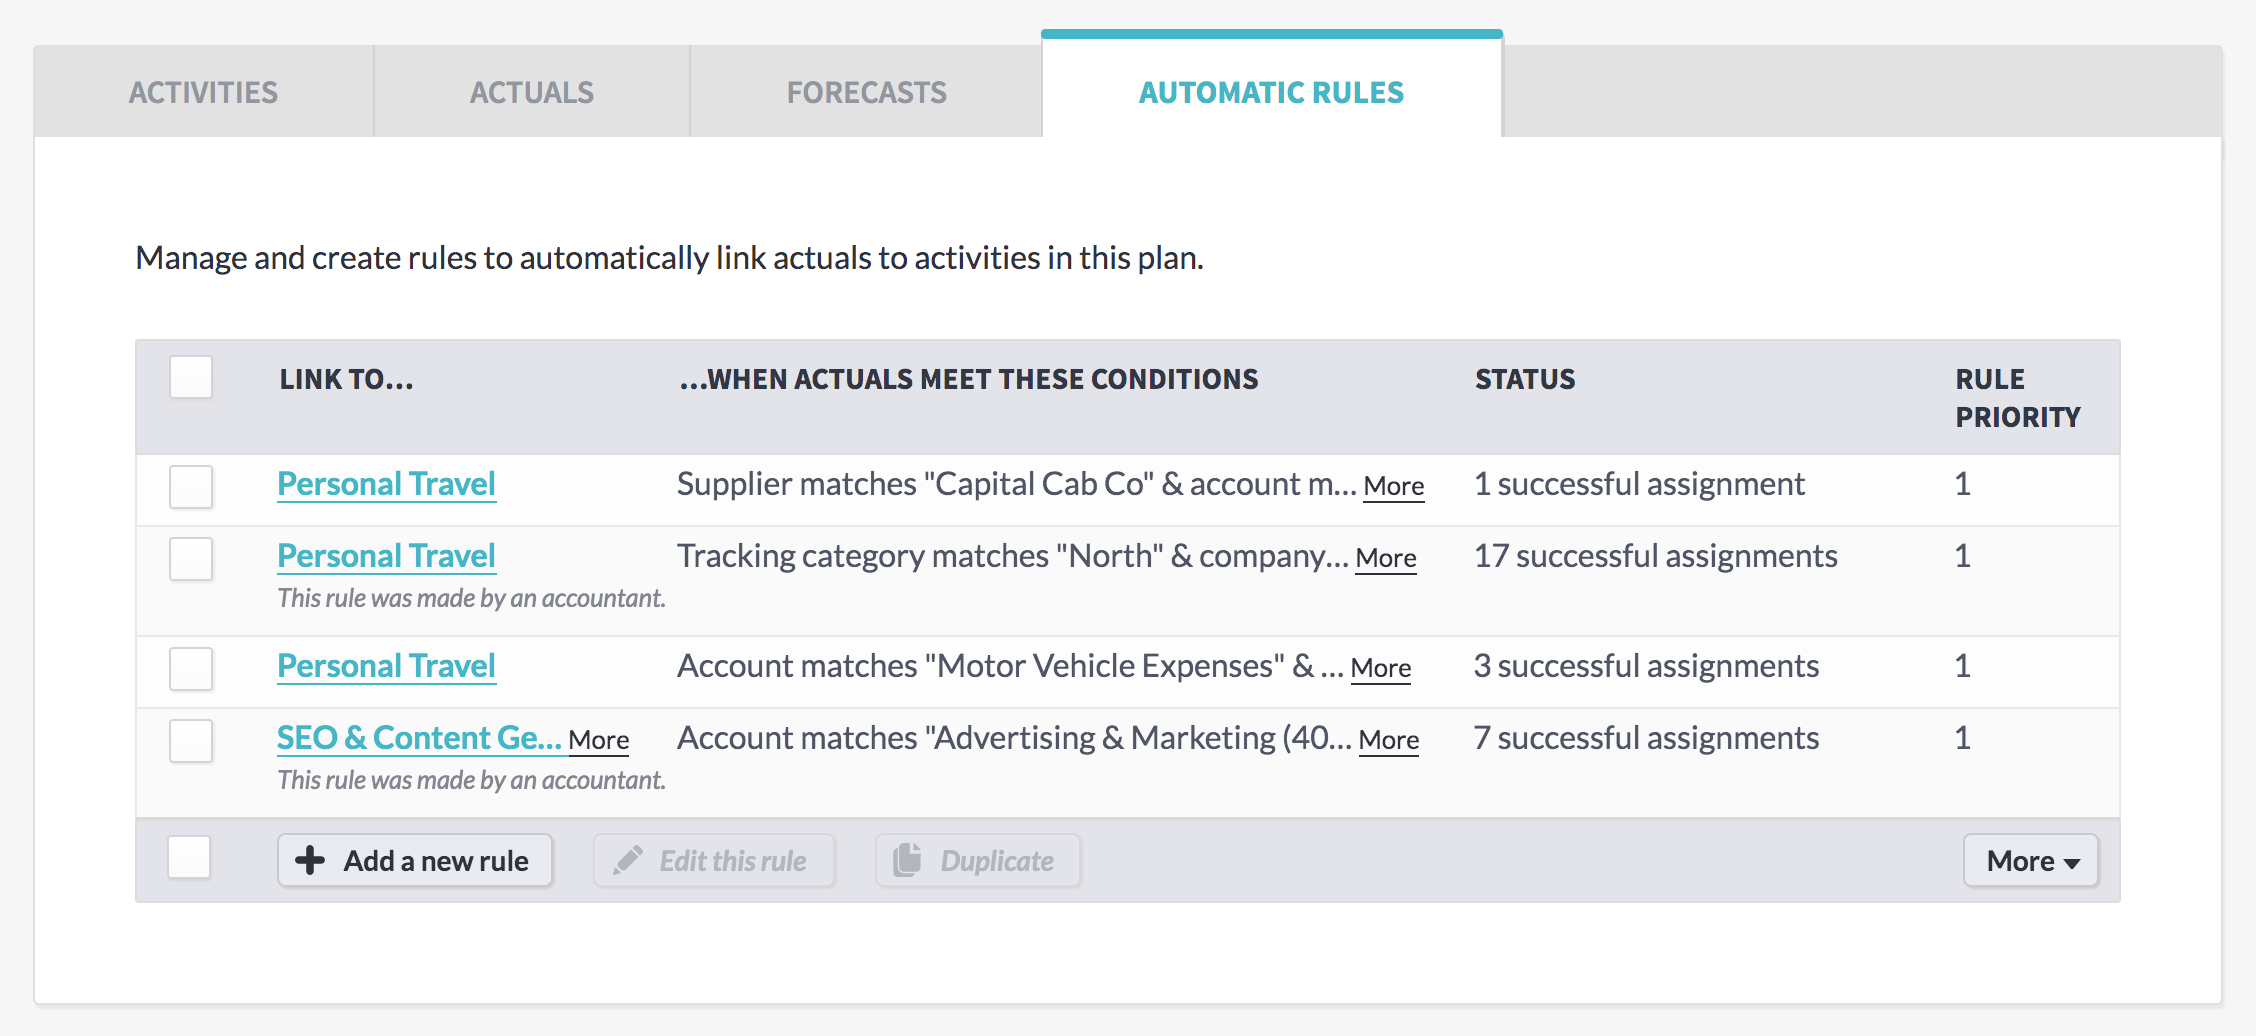
All the rules that have been created across accounting or across a particular plan will show in a table.
You’ll be able to see where they’re linking to, what their conditions are, their priority, and their status.
Status is how many times that rule has successfully assigned an actual to the right place. Hopefully that’s all the time, but plan owners have a ‘not for this plan’ button they can press if an actual has come to them that shouldn’t.
If a rule is too broad, it might send actuals to the wrong place, so this number is useful to keep an eye on. Keep watch to see if your rule needs to be tweaked to take other things into consideration.
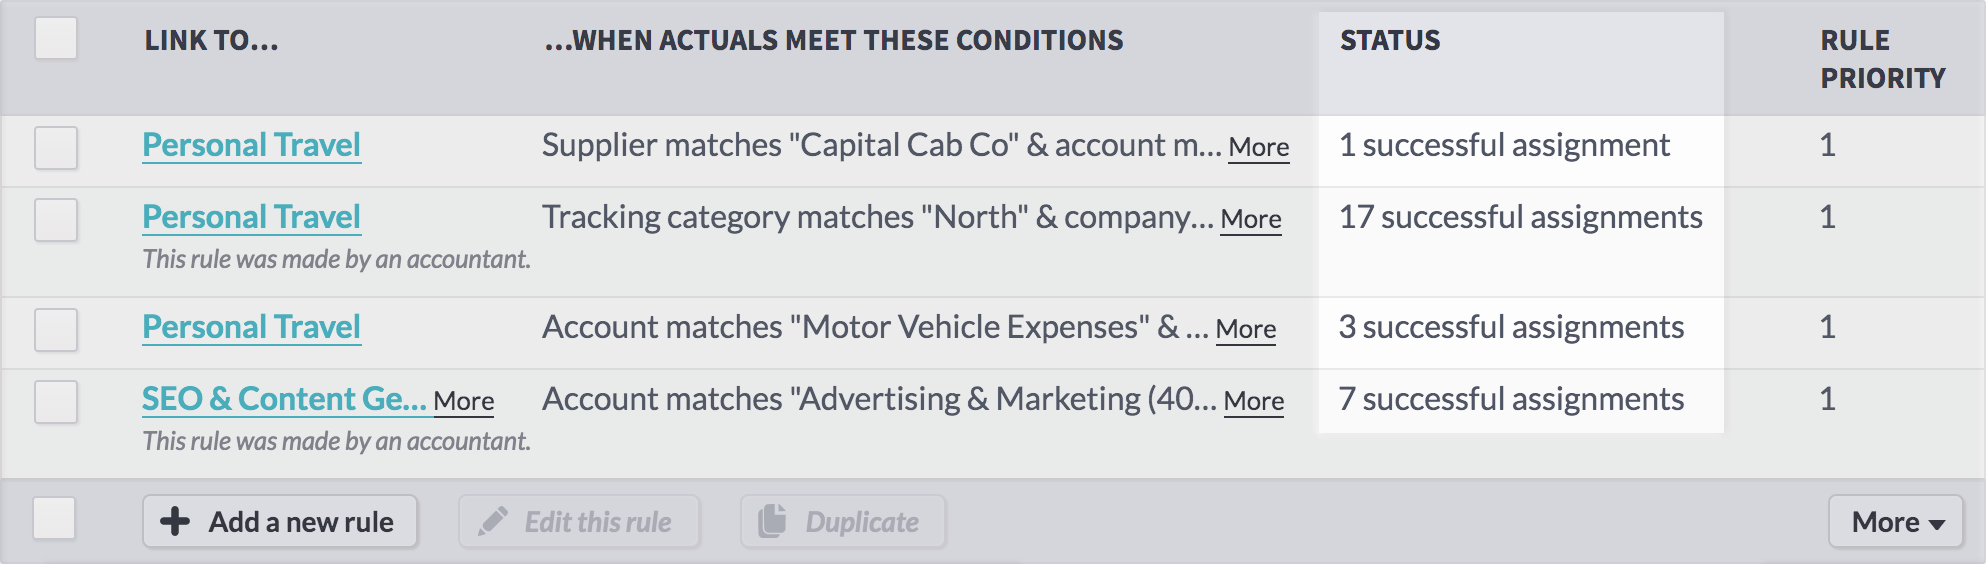
You can edit a rule by clicking the ‘edit’ button on the table, and all future transactions will be affected by the new, improved rule.
Work smarter
Rules are all about working smarter. (And drinking more tea.)
If there are small differences between actuals that would put them in different activities – say transactions from the same supplier, Advertizely, should always be in marketing but ones with a particular account code should be in a particular activity – you can use one rule as a jumping off point for another.
Rather than repeating all the conditions you’ve entered before, you can choose a rule and click the ‘duplicate’ button, using it as a starting off point rather than making a new rule from scratch.
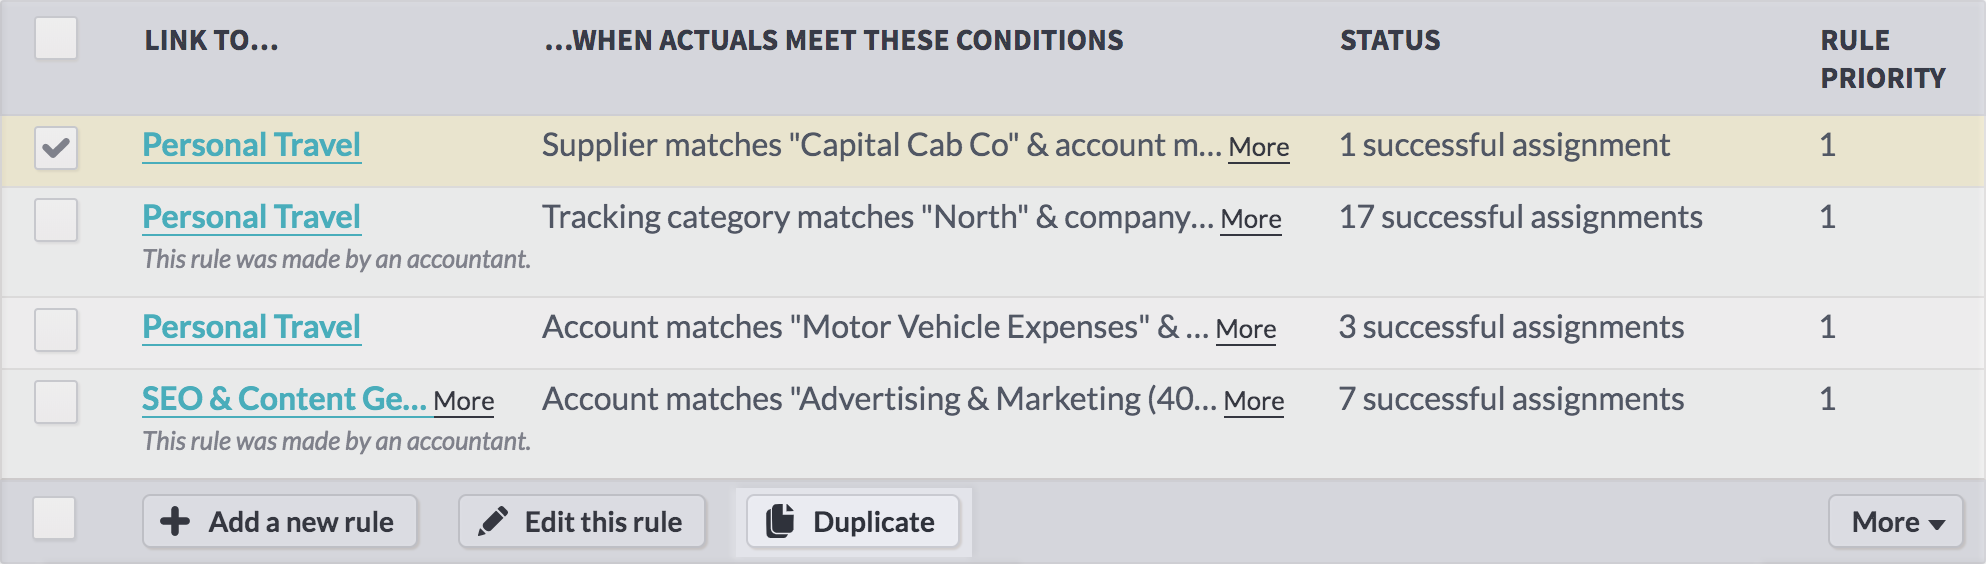
(Don’t worry – Beyond will always tell you if the rule you’re making already exists and what kind of impact it’s likely to have, so you can make the rules that work best for you.)
Rules rule
Start making rules to automate your work and free up your time now. Right now!
The post Feature spotlight: automatic rules appeared first on Beyond.
]]>The post Activity Categories: new dimensions of budgeting appeared first on Beyond.
]]>Being able to answer these questions in real-time already places you many steps ahead of most businesses, but we can do even better.

How about being able to answer these questions?
- What’s my monthly spend on travel and how does it compare to other categories?
- How do my revenue and costs compare across locations?
- How much per year is going towards business-as-usual versus strategic work?
- What is the budget variance for my key programmes across the business?
These questions, and many more, can now be answered with the powerful new view added to the Budget Explorer:
And this view is just the start – from here you can click into any category and drill down to the underlying activities, actuals and forecasts that drive it. Very cool.
These views are made possible by the use of ‘Activity Categories’. They’re extremely flexible – think of any category or dimension you’d like to tag activities with (like Location, Programme, Type, Client, Goal…) and list the different values this category can take. Then whenever any user creates an activity, they’ll be able to choose which category value to tag that activity with.

In only a few clicks, you can ensure every relevant activity is tagged by the categories that make sense to you. Tracking budgets and managing activities across the business just got a whole lot easier.
Happy tagging!
Of course, the Budget Explorer view and the underlying Activity Categories are both completely customisable, so you can slice, dice, breakdown and summarise based on your precise business needs (and update them as they change).
With Beyond, you’re always in control.
The post Activity Categories: new dimensions of budgeting appeared first on Beyond.
]]>The post Introducing the dashboard: everything you need to know appeared first on Beyond.
]]>
…what do you mean you asked for a pony?!
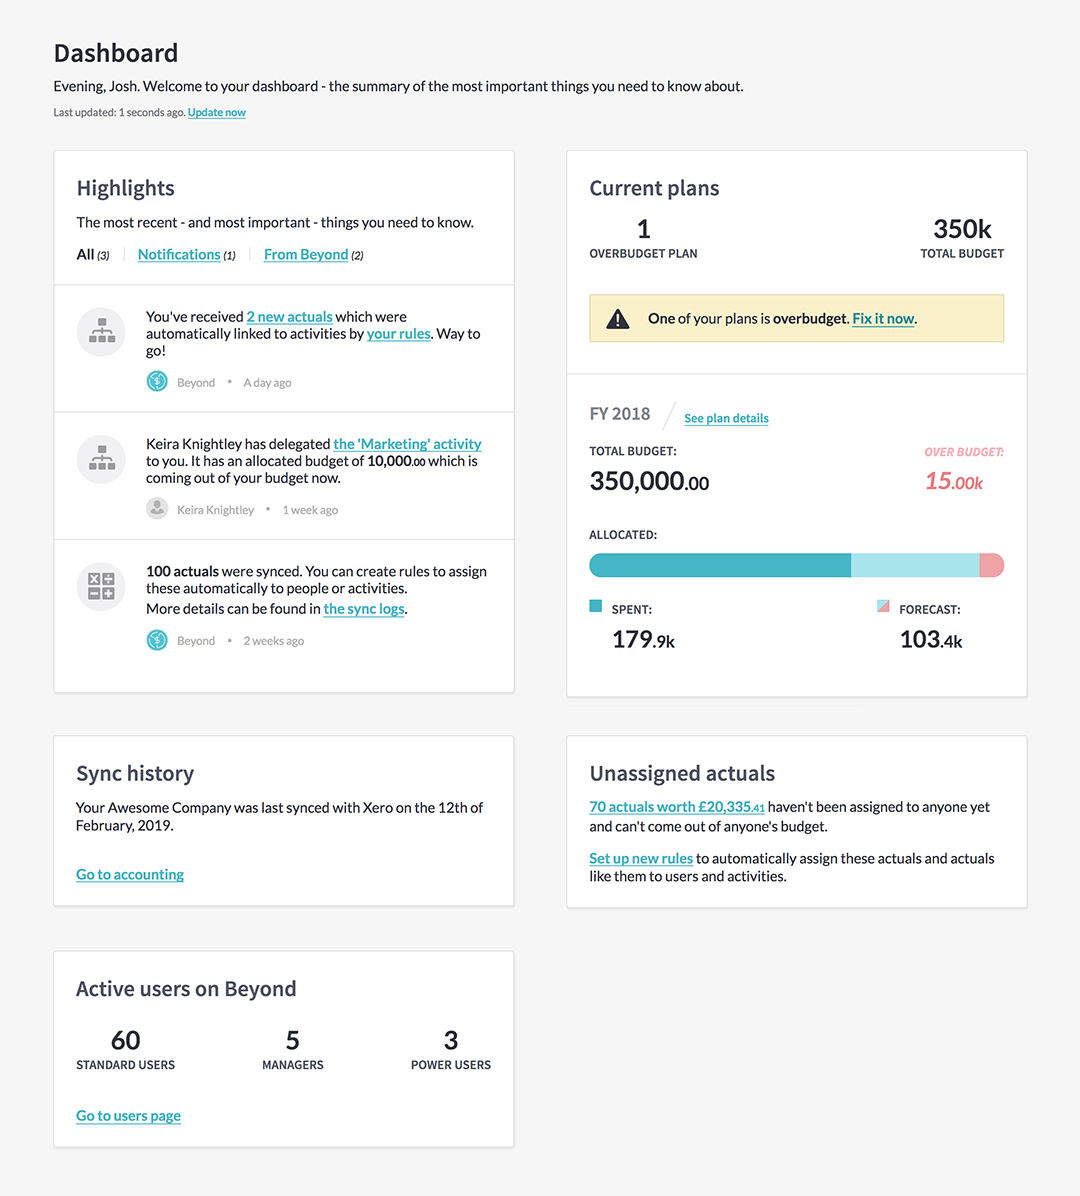
Now, as soon as you log in, you’ll see a summary of the most important things you need to know – with anything you need to take action on or worry about highlighted, so you can’t miss it.
We think it’s a fantastic tool that will help save your time and draw your attention where it’s needed. (Though we are, of course, massively biased.)
Let’s dive in and show off show you how it can help make your life easier!
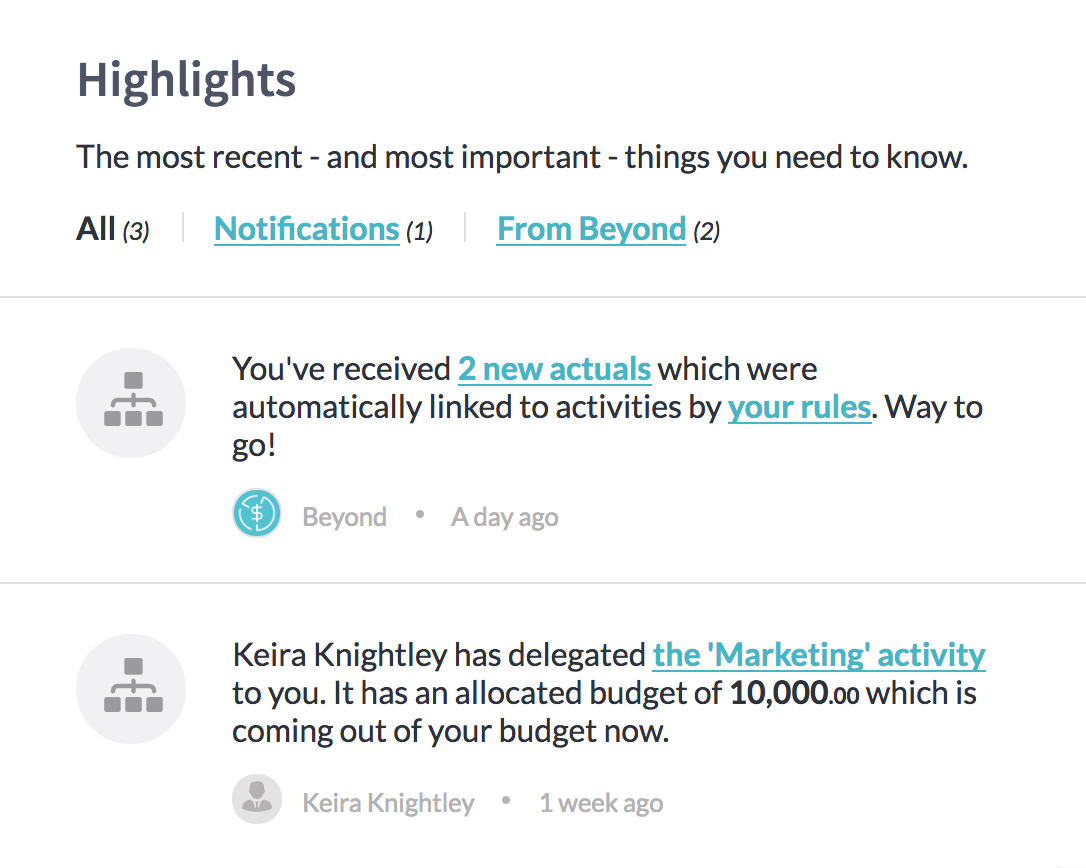
Highlights
Available for all users.
Highlights are the most recent – and most important – things you need to know about.
Similar to notifications, highlights will let you know when you’ve been invited to a plan, been delegated an activity, received new actuals, or been asked to approve budgets.
But they’ll also give you updates from the Beyond team, letting you know when we’ve released (amazing) new features or when we’re planning on making updates to the app that will affect your workflow. (For the better, naturally!)
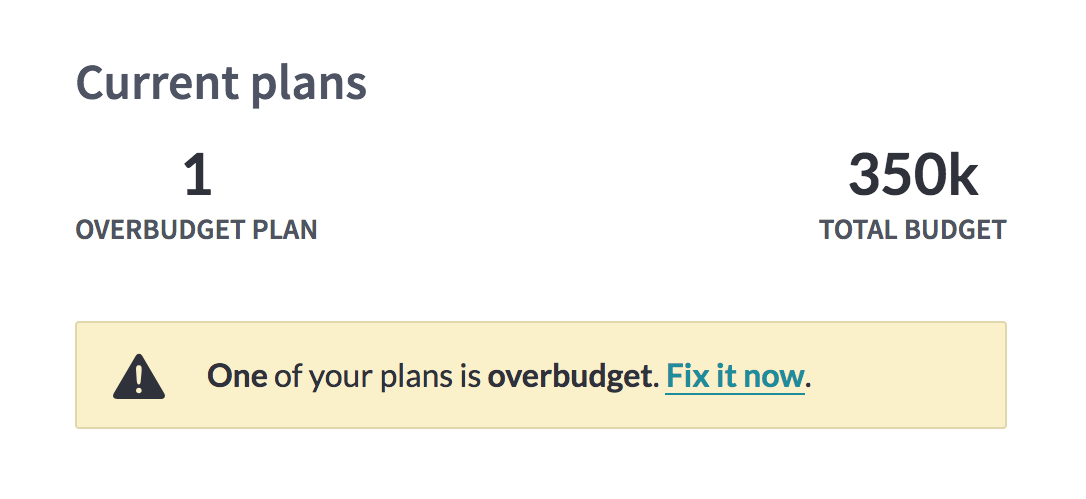
Current plans
Available for all users.
Current plans might be the single most useful feature we’ve added to Beyond. (Shh! Don’t tell Highlights!)
It summarises all your currently running plans, whether they’re for work you’re planning with the whole company or a small project you’re planning alone.

If any plan is overbudget, it highlights the problem right away, making sure you can spot any issues before they become issues.
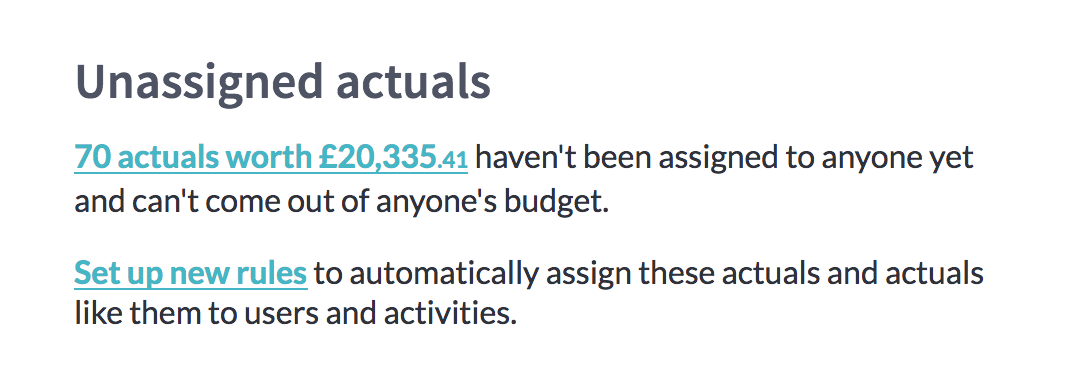
Unassigned actuals
Available for accountants.
When actuals come in from your accounting platform, it’s important to know where they belong and what budget they should be coming out of – or else your numbers might be closer to the red than they look!
The unassigned actuals section will highlight any actuals in the business that haven’t been assigned to a user yet, and help you work out where they belong.
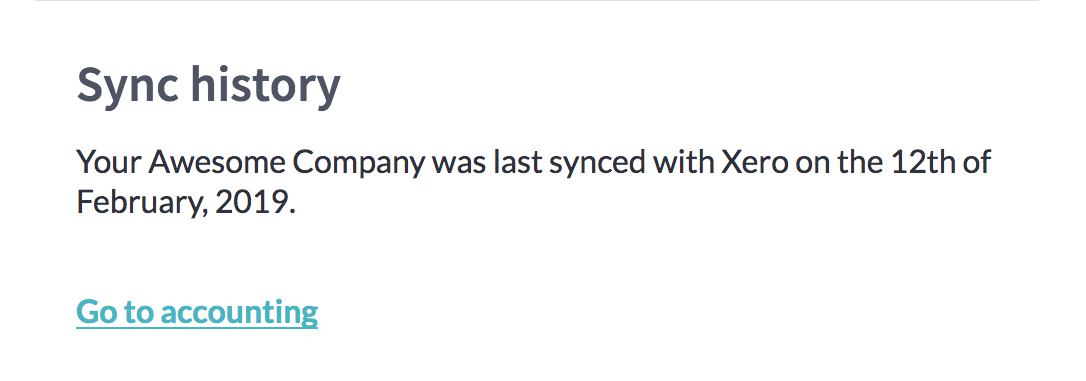
Sync history
Available for accountants.
We know how important it is to keep your plans up-to-date with the latest data from your accounting software. And we know how nervous it can make you, wondering if you definitely have all the facts, before you make a big decision. (Yes, you Ethel. We’ve seen you hit that manual sync button twelve times in a row…)
That’s why we’ve put details about the last sync right on the dashboard page, so you can be assured you’re looking at the most up-to-date data there is.
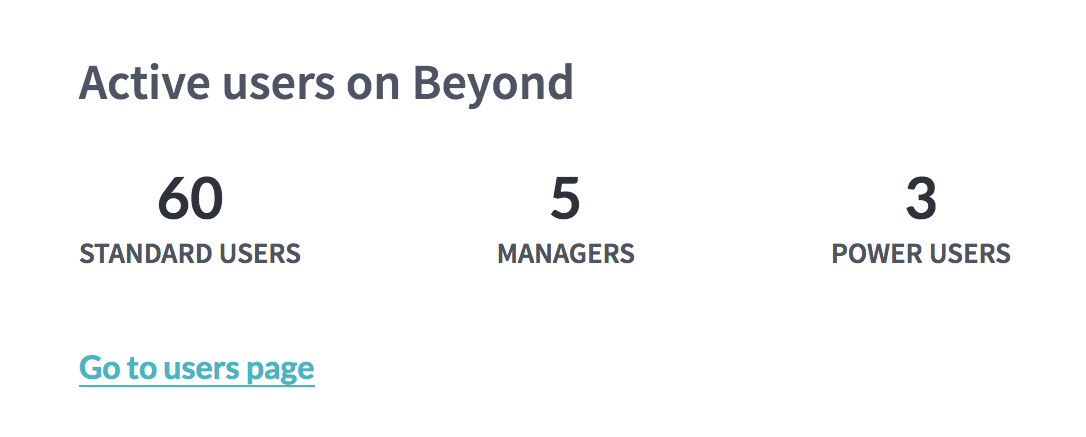
Active users
Available for power users.
To make sure you have a solid grip on how many active accounts you have on Beyond and what price bracket that falls into, we’ve broken the numbers down (it’s sort of what we’re good at, not to brag) into standard users, managers, and power users. You’re welcome!
And that’s not all!
We’re planning on adding a lot more features to the dashboard, to make it even more useful for you, like adding the ability to order the dashboard exactly how you like it and to choose exactly what you want to see… And we want to hear what that is!
Let us know what features you’d find useful, what you want to see on the dashboard going forward, and how we can make it even better for you. Email us on support@headbeyond.com with any ideas, complaints, or compliments. We’d love to know how we can make Beyond even better for you!
The post Introducing the dashboard: everything you need to know appeared first on Beyond.
]]>The post Feature spotlight: integrating Xero with Beyond appeared first on Beyond.
]]>And there’s nothing more… repetitive than having to enter the same data into different systems.
That’s why we built a secure system to take all of the information you’ve already put into your Xero accounting software – that you really, really don’t want to go through again – and automatically import it into Beyond. You have the power of Xero’s actual and invoice information and the benefit of having all of your financial planning in one place without the pain, headaches, or tears of entering it all over and over again.
Best of all, it’s easy to set-up. No, really! We’ll prove it!
The post Feature spotlight: integrating Xero with Beyond appeared first on Beyond.
]]>